Developer Guide
- Setting up, getting started
- Design
- Implementation
- Documentation, logging, testing, configuration, dev-ops
- Appendix: Requirements
- Appendix: Planned Enhancements
- Appendix: Instructions for manual testing
Setting up, getting started
Refer to the guide Setting up and getting started.
Design
 Tip: The
 .puml files used to create diagrams are in this document docs/diagrams folder. Refer to the PlantUML Tutorial at se-edu/guides to learn how to create and edit diagrams.
Architecture
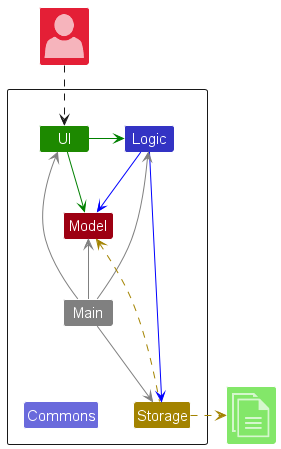
The Architecture Diagram given above explains the high-level design of the application.
Below is a quick overview of the main components and how they interact with each other.
Main components of the architecture
Main (consisting of the classes Main and MainApp) is in charge of the application launch and shut down.
- On application launch, it initializes the other components in the correct sequence, and connects them up with each other.
- On shut down, it shuts down the other components and invokes cleanup methods where necessary.
The bulk of the application’s work is done by the following four components:
-
UI: The User Interface of the application. -
Logic: The command executor. -
Model: Holds the application data in memory. -
Storage: Reads data from, and writes data to, the hard disk.
Commons represents a collection of classes used by multiple other components.
How the architecture components interact with each other
The Sequence Diagram below shows how the architecture components interact with one another for the scenario where the user issues the command /delete ; name : Poochie:
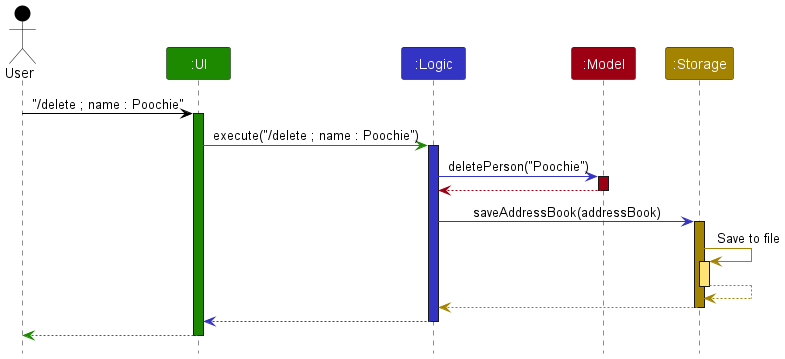
Each of the four main components (also shown in the diagram above):
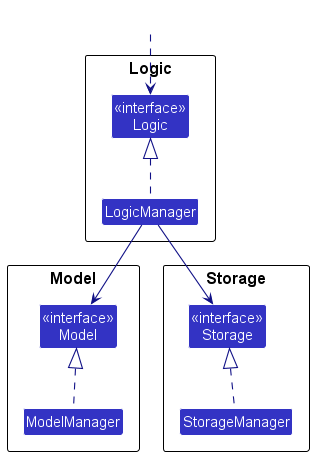
- Defines its API in an
interfacewith the same name as the component. - Implements its functionality using a concrete
{Component Name} Managerclass which follows the corresponding API interface mentioned in the previous point.
For example, the Logic component defines its API in the Logic.java interface and implements its functionality using the LogicManager.java class which follows the Logic interface. Other components interact with a given component through its interface rather than the concrete class (reason: to prevent outside components from being coupled to the implementation of a component), as illustrated in the (partial) class diagram below:
UI component
The API of this component is specified in Ui.java.
Below is a class diagram of the UI component:
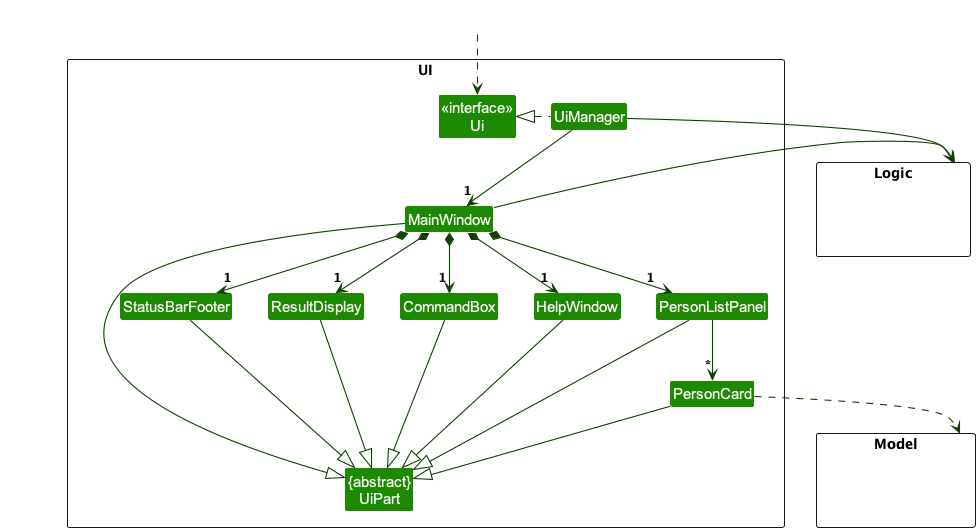
The UI consists of a MainWindow component which itself is made up of sub-components e.g.CommandBox, ResultDisplay, PersonListPanel, StatusBarFooter etc. All these UI components, including the MainWindow component, inherit from the abstract UiPart class which captures the commonalities between classes that represent parts of the visible GUI.
The UI component uses the JavaFX UI framework. The layout of these UI parts are defined in matching .fxml files that are located in the src/main/resources/view folder. For example, the layout of the MainWindow component is specified in MainWindow.fxml
The UI component:
- Executes user commands using the
Logiccomponent. - Listens for changes to
Modeldata so that the UI can be updated with the modified data. - Keeps a reference to the
Logiccomponent, because theUIcomponent relies on theLogiccomponent to execute commands. - Depends on some classes in the
Modelcomponent, as it displays thePersonobject residing in theModel.
Logic component
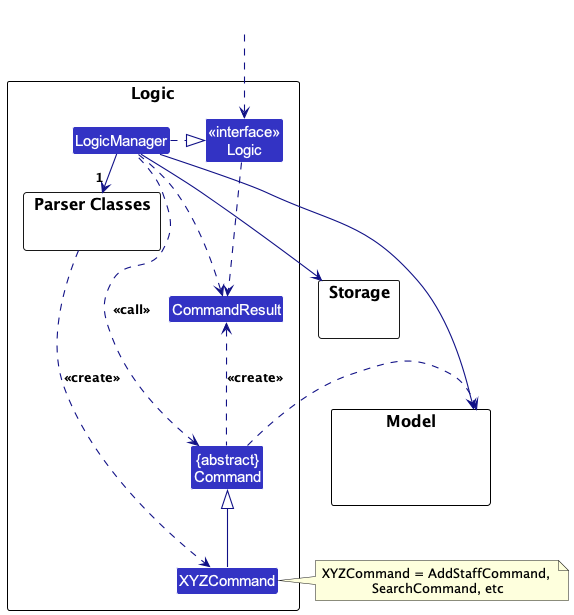
The API of this component is specified in Logic.java.
Below is a (partial) class diagram of the Logic component:
The sequence diagram below illustrates the interactions within the Logic component, taking execute("/delete ; name : Poochie") API call as an example.
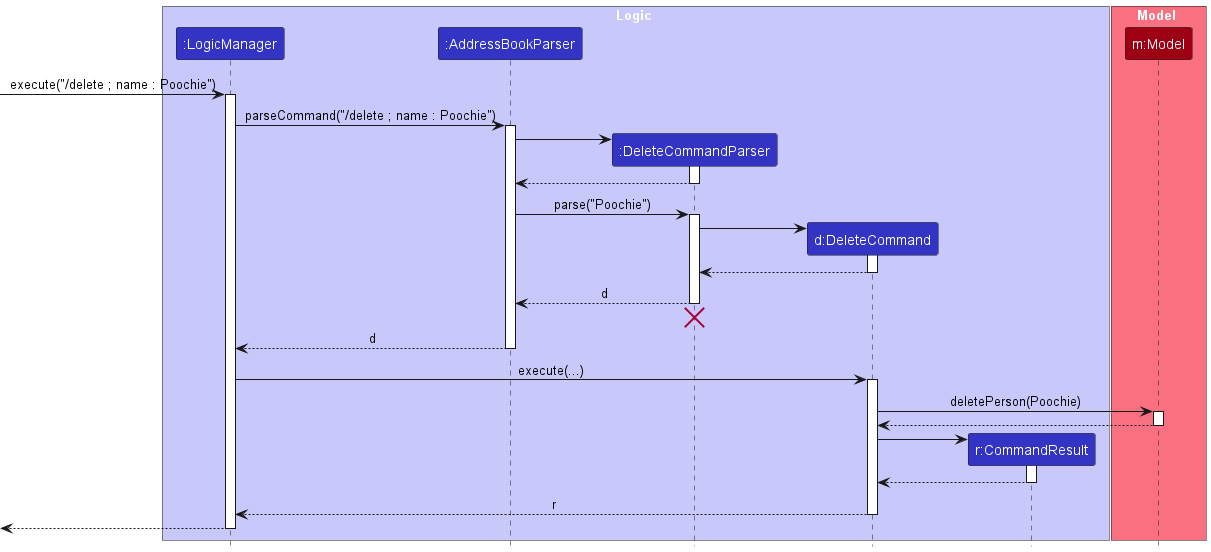
 Note: The lifeline for
 DeleteCommandParser should end at the destroy marker (X) but due to a limitation of PlantUML, the lifeline continues till the end of the diagram.
Execution lifecycle of the Logic component:
- When
Logicis called upon to execute a command, it is passed to anAddressBookParserobject which in turn creates a parser that matches the command (e.g.DeleteCommandParser) and uses it to parse the command. - This results in a
Commandobject (more precisely, an object of one of its subclasses e.g.DeleteCommand) which is executed by theLogicManager. - The command can communicate with the
Modelwhen it is executed (e.g. to delete a person).
Note that although this is shown as a single step in the diagram above (for simplicity), in the code it can take several interactions (between the command object and theModel) to achieve. - The result of the command execution is encapsulated as a
CommandResultobject which is returned back fromLogic.
Illustrated below are the other classes in Logic (omitted from the class diagram above) that are used for parsing a user command:
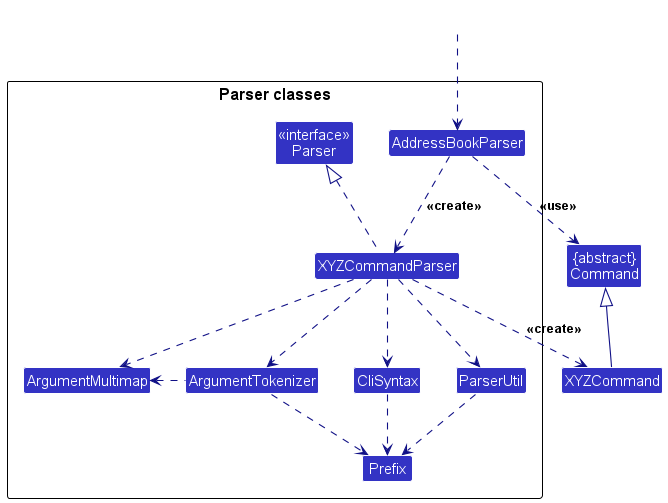
How the parsing works:
- When called upon to parse a user command, the
AddressBookParserclass creates anXYZCommandParser(XYZis a placeholder for the specific command name e.g.AddCommandParser).XYZCommandParseruses the other classes as shown above to parse the user command and creates anXYZCommandobject (e.g.AddCommand) which theAddressBookParserreturns back as aCommandobject. - All
XYZCommandParserclasses (e.g.AddCommandParser,DeleteCommandParseretc.) inherit from theParserinterface so that they can be treated similarly where possible (e.g. during testing).
Model component
The API of the Model component is specified in Model.java.
Below is a class diagram of the Model component:
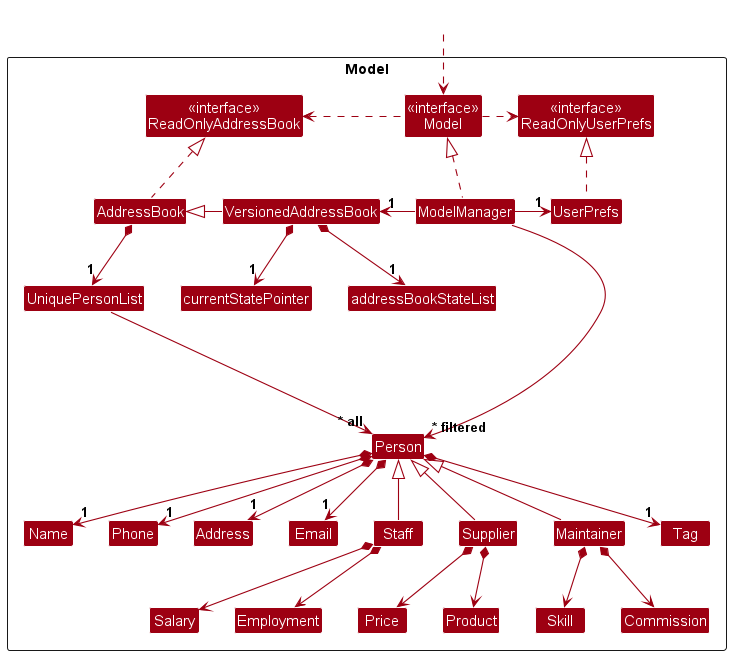
The Model component:
- Stores different states of
AddressBookinsideVersionedAddressBook. - Stores all data from PoochPlanner (i.e. all
Personobjects which are contained in aUniquePersonListobject). - Stores the currently “selected”
Personobjects (e.g. results of a search query) as a separate filtered list which is exposed to outsiders as an unmodifiableObservableList<Person>object that can be “observed” (e.g. the UI can be bound to this list so that the UI automatically updates when the data in the list changes). - Stores a
UserPrefobject that represents the user’s preferences. This is exposed to outsiders as aReadOnlyUserPrefobject. - Does not depend on any of the other three components (as the
Modelrepresents data entities of the domain, they should make sense on their own without depending on other components).
Storage component
The API of this component is specified in Storage.java.
Below is a class diagram of the Storage component:
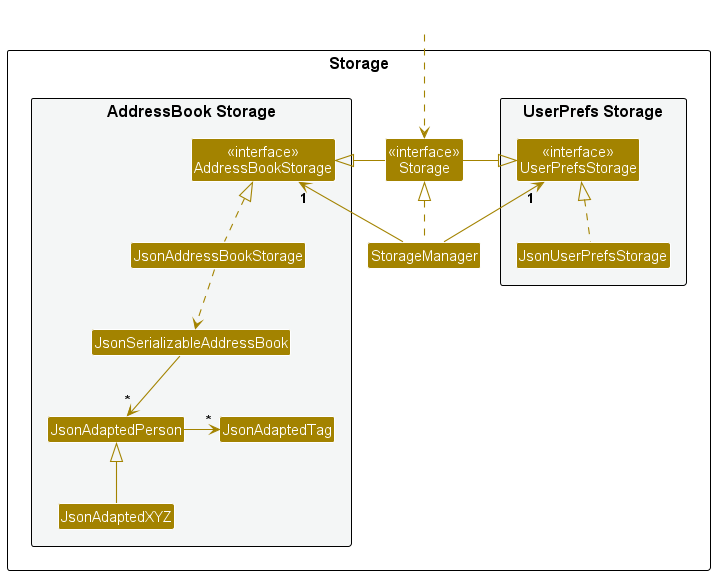
The Storage component:
- Saves both PoochPlanner data and user preference data in JSON format, which is read during the bootup of PoochPlanner.
- Inherits from both
AddressBookStorageandUserPrefStorageinterfaces, which means that it can be treated as either one (if the functionality of only one interface is needed). - Depends on some classes in the
Modelcomponent (because theStoragecomponent’s job is to save and retrieve objects that belong to theModel).
Common classes
Classes used by multiple components are in the seedu.addressbook.commons package.
Implementation
This section describes some noteworthy details on how certain features are implemented.
Add feature
Overview
The add-XYZ command enables users to add a new contact to PoochPlanner.
The following sequence diagram models the interactions between the different components of PoochPlanner for the execution of the add-person command:
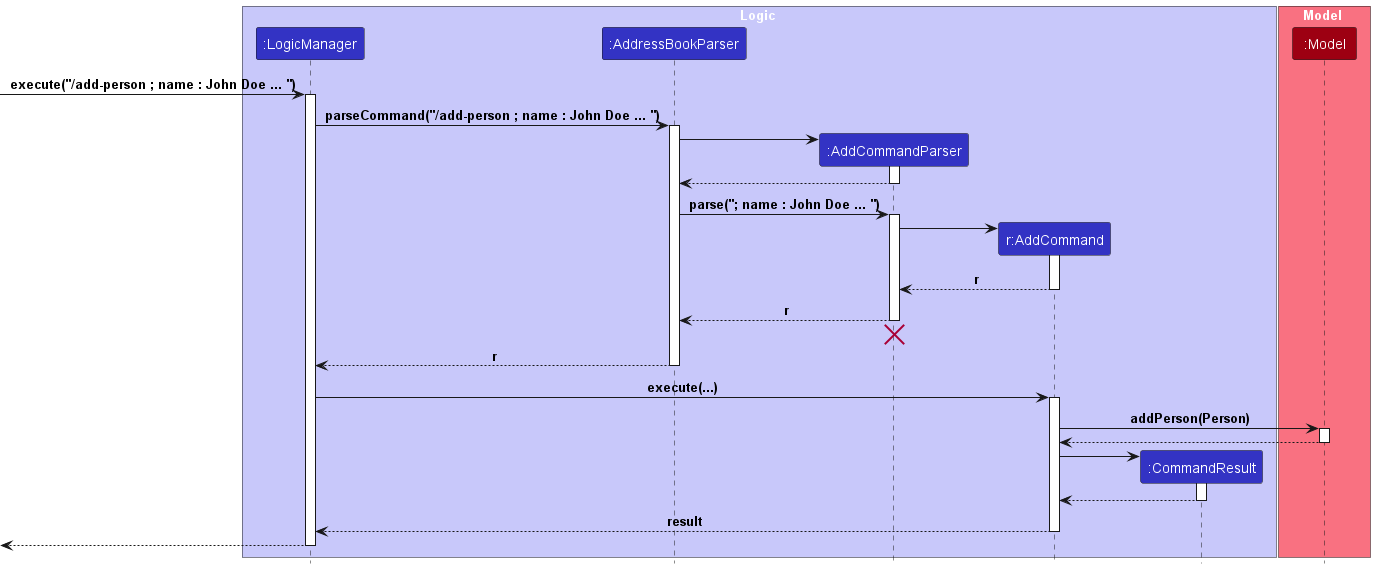
Note: The implementation for adding Person, Staff, Supplier, and Maintainer are similar and only differ in their accepted attributes. XYZ can refer to either person, staff, supplier, or maintainer.
Details
- The user inputs the command to add a new contact.
- An
AddCommandParserobject invokes itsparsemethod which parses the user input. - An
AddCommandobject is created. - The
AddCommandParserobject returns theAddCommandobject. - A
LogicManagerobject invokes theexecutemethod of theAddCommandobject. - The
executemethod of theAddCommandobject invokes theaddPersonmethod of itsModelargument to create a new contact with a newPersonobject. - The
executemethod of theAddCommandobject returns aCommandResultobject which stores the data regarding the completion of theadd-XYZcommand.
Example Usage
- The user launches the application.
- The user inputs
/add-person ; name : John Doe ; phone : 98765432 ; email : johnd@example.com ; address : 311, Clementi Ave 2, #02-25into the CLI. - The contact card for the person named “John Doe” is created. This change should be reflected in the contacts list in PoochPlanner.
Edit feature
Overview
The edit-XYZ command enables users to modify specified field(s) of an existing contact in PoochPlanner.
The following sequence diagram models the interactions between the different components of PoochPlanner for the execution of the edit-XYZ command:
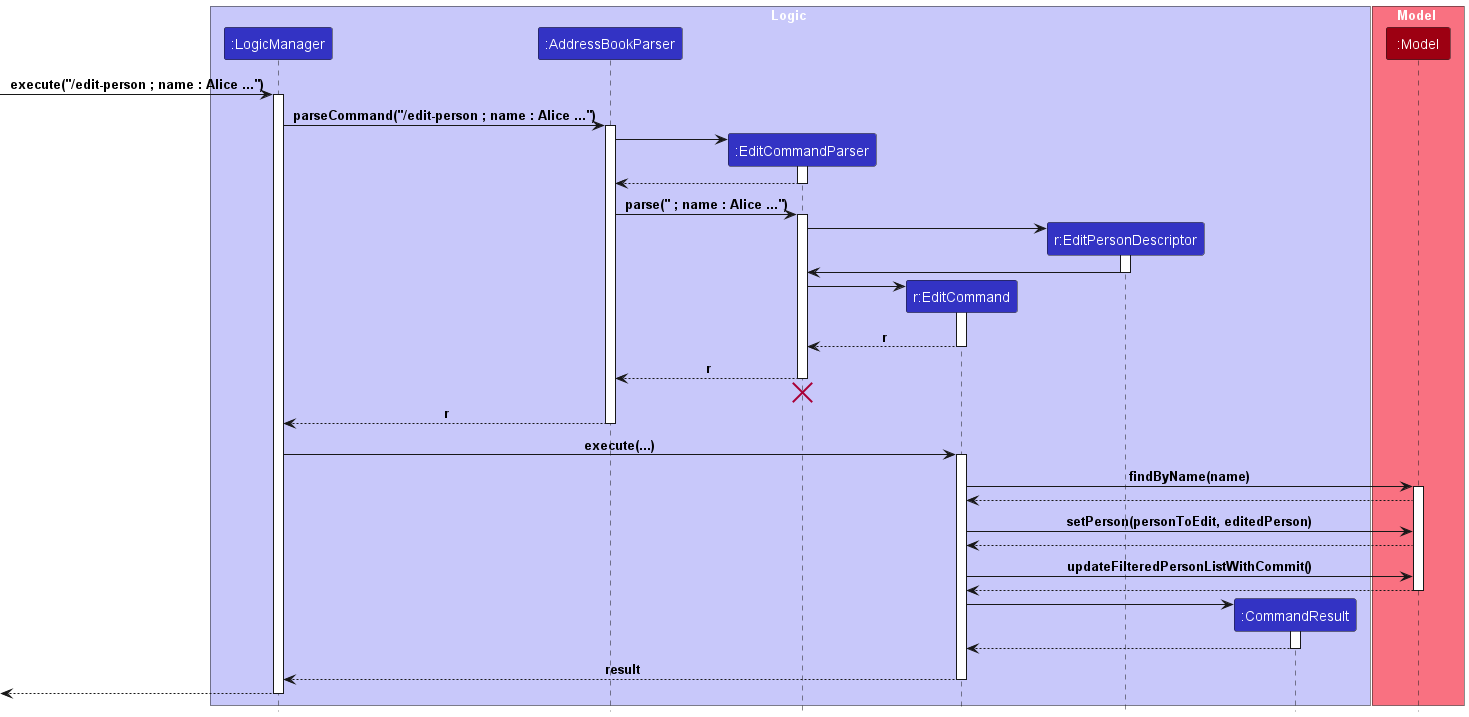
Note: The implementation for editing a Person, Staff, Supplier, and Maintainer are similar and only differ in their accepted attributes. XYZ can refer to either person, staff, supplier, or maintainer.
Details
- The user inputs the command to edit an existing contact by first stating the name of the contact they want to edit. This is followed by specifying the respective fields and new values that the user wants to modify.
- An
EditCommandParserobject invokes itsparsemethod which parses the user input and creates anEditPersonDescriptorobject which contains the new values to be edited for the specified contact. - An
EditCommandobject is created with the name of the contact to edit and theEditPersonDescriptorobject. - The
EditCommandParserreturns theEditCommandobject. - A
LogicManagerobject invokes theexecutemethod of theEditCommandobject. - The
executemethod of theEditCommandobjects finds the specified contact by its name. Theexecutemethod then calls thecreateEditedPersonmethod of theEditCommandobject which creates a newPersonobject that contains the updated values of the contact. - The
executemethod of theEditCommandobject invokes thesetPersonmethod of itsModelargument to replace the specified contact with the newPersonobject. - The
executemethod of theEditCommandobject invokes theupdateFilteredPersonListmethod of itsModelargument to update the view of PoochPlanner to show all contacts. - The
executemethod of theEditCommandobject returns aCommandResultobject which stores the data regarding the completion of theedit-XYZcommand.
Example Usage
- The user launches the application.
- The user inputs
/edit-person ; name : Alice Tan ; field : { phone : 9990520 ; email : impooch@gmail12.com }into the CLI. - The contact card for the person named “Alice Tan” has its
phoneandemailfields updated respectively. This change should be reflected in the contacts list in PoochPlanner.
Aspect: How to implement the edit command
-
Alternative 1 (current choice): Create four distinct edit commands for the four contact types (
Person,Staff,Maintainer,Supplier).- Pros: More user-friendly since users will be less prone to error that involves trying to edit a field that does not exist for the specific contact type.
- Cons: Steeper learning curve for users due to the greater number of commands.
-
Alternative 2: Use only one edit command across all classes by using a dynamic edit parser. The dynamic edit parser will internally route to the correct edit command to handle the modification of different contact types separately.
- Pros: Much simpler suite of features for users, which makes it easier for users to start using PoochPlanner.
- Cons: Complex to implement since the checking of the contact type must be done at the point of parsing by the dynamic edit parser. However, doing so will violate the intended abstracted implementation of MVC (Model-View-Controller) as the model will have to be accessible from within the parser class in order for the type checking to be done.
Search feature
Overview
The search command enables users to find contacts in PoochPlanner that match the input search query.
The following sequence diagram models the interactions between the different components of PoochPlanner for the execution of the search command:
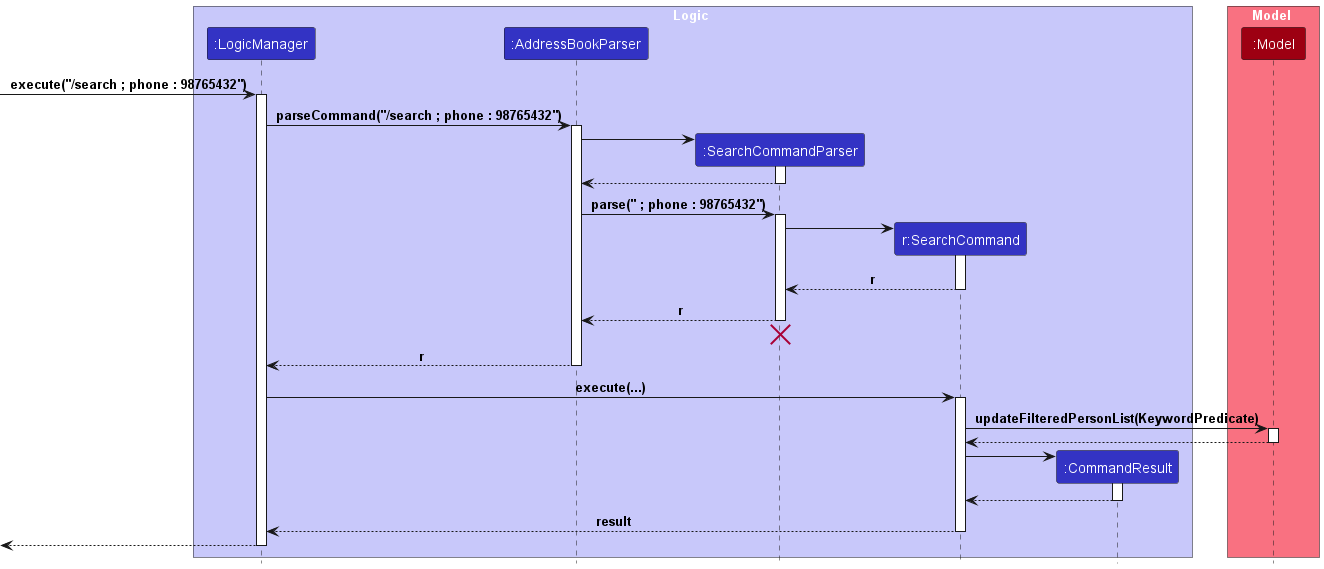
Details
- The user inputs the command to search for contacts with the specified search query.
- A
SearchCommandParserobject invokes itsparsemethod which parses the user input by storing the prefixes and their respective values in anArgumentMultimapobject, and using this object to create an instance ofKeywordPredicate. - The
SearchCommandParserobject then creates aSearchCommandobject containing the aforementionedKeywordPredicateobject. - A
LogicManagerobject invokes theexecutemethod of theSearchCommandobject. - The
executemethod of theSearchCommandobject invokes theupdateFilteredPersonListmethod of itsModelargument, taking in theKeywordPredicateobject as a parameter to filter and update the view of PoochPlanner. - The
executemethod of theSearchCommandobject returns aCommandResultobject which stores the data regarding the completion of thesearchcommand.
Example Usage
- The user launches the application.
- The user inputs
/search ; name : Poochieinto the CLI. - PoochPlanner is updated to display all contact cards with contacts containing “Poochie” in their name.
Aspect: How to implement the search command
-
Alternative 1 (current choice): Accept multiple search fields in the search query.
- Pros: More user-friendly as users can search using multiple fields at once, allowing for a more targeted search.
- Cons: More prone to errors due to the broader search scope over multiple fields.
-
Alternative 2: Only accept one field in the search query.
- Pros: Less prone to errors due to the stricter search only over one field.
- Cons: Less user-friendly since users will not be able to search using multiple fields at once.
Delete feature
Overview
The delete command enables users to delete a specific contact from PoochPlanner.
The following sequence diagram models the interactions between the different components of PoochPlanner for the
execution of the delete command:

Details
- The user inputs the command to delete a contact by stating the name of the contact they want to delete.
- A
DeleteCommandParserobject invokes itsparsemethod which parses the user input by storing the prefixes and their respective values as anArgumentMultimapobject. - A
DeleteCommandobject is created with the name of the contact to delete. - The
DeleteCommandParserobject returns theDeleteCommandobject. - A
LogicManagerobject invokes theexecutemethod of theDeleteCommandobject. - The
executemethod of theDeleteCommandobject invokes thedeletePersonmethod of itsModelargument which removes the specified contact from itsaddressBookproperty. - The
executemethod ofDeleteCommandreturns aCommandResultobject which stores the data regarding the completion of thedeletecommand.
Example Usage
- The user launches the application.
- The user inputs
/delete ; name : Poochieinto the CLI. - The contact with the name “Poochie” will be deleted from PoochPlanner. This change should be reflected in the contacts list in PoochPlanner.
Aspect: How to implement delete command
-
Alternative 1 (current choice): Accept multiple name fields, where only the last name field will be taken.
- Pros: More user-friendly. Should users make a mistake, they can easily append another name field without deleting the previous name field entered.
- Cons: Less rigorous validation check on entered names as users may not intentionally enter a second name field.
-
Alternative 2: Accept only one name field.
- Pros: Less prone to possible errors due to stricter validation checks on name fields.
- Cons: Less user-friendly since users will have to put in more effort to fix their commands.
Rate feature
Overview
The rate command enables users to rate a specific contact in PoochPlanner.
The following sequence diagram models the interactions between the different components of PoochPlanner for the
execution of the rate command:
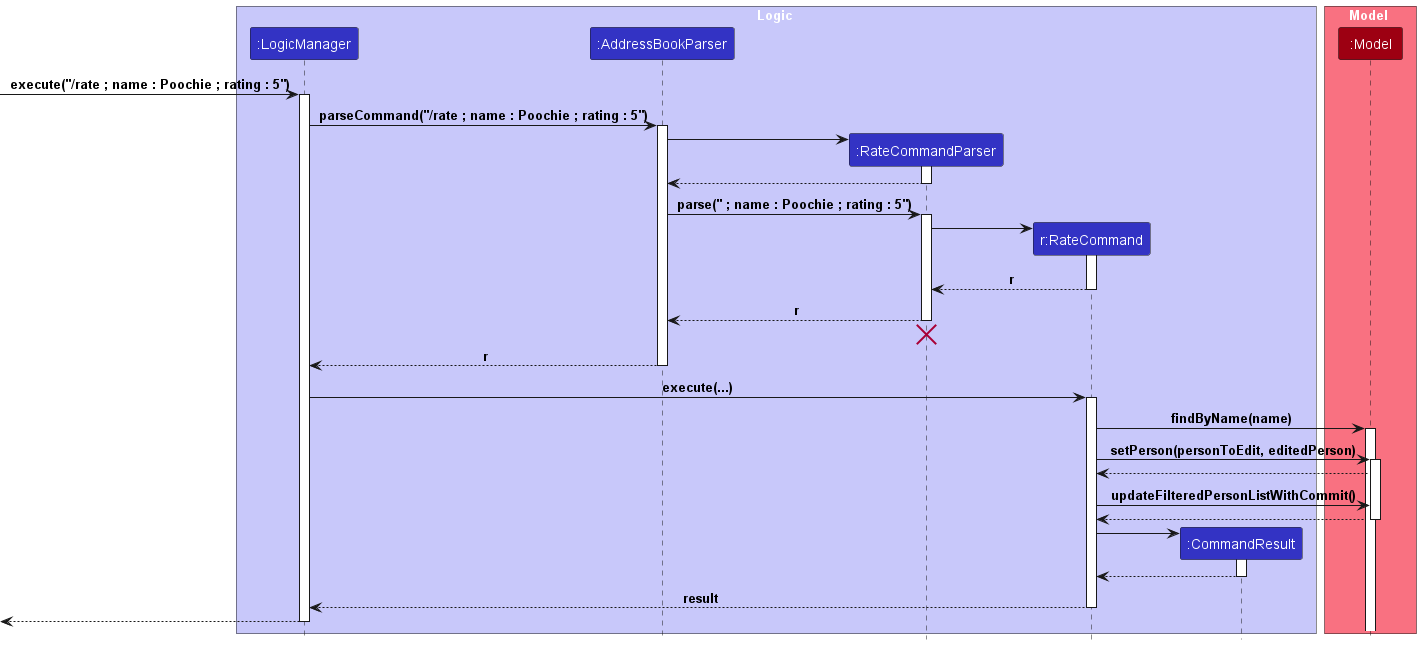
Details
- The user inputs the command to add a rating to a specific contact by first stating the name of the contact they want to rate. This is followed by the rating to be given to the user.
- A
RateCommandParserobject invokes itsparsemethod which parses the user input by storing the name and its prefix in anArgumentMultimapobject. - A
RateCommandobject is created with the parsed name and rating. - A
LogicManagerobject invokes theexecutemethod of theRateCommandobject. - The
executemethod of theRateCommandobject invokes thefindByNamemethod of itsModelargument to find the contact with the specified name. - The
executemethod of theRateCommandobject invokes thesetPersonmethod of itsModelargument to set the contact in the existing contacts list to the newPersonobject which has been edited by theexecutemethod of theRateCommandobject. - The
executemethod of theRateCommandobject invokes theupdateFilteredPersonListmethod of itsModelargument to update the view of PoochPlanner to show all contacts. - The
executemethod of theRateCommandobjects returns aCommandResultobject which stores the data regarding the completion of theratecommand.
Example Usage
- The user launches the application.
- The user inputs
/rate ; name : Poochie ; rating : 5into the CLI. - The contact with the name “Poochie” is given a rating of “5”. This change should be reflected in the contacts list in PoochPlanner.
Aspect: How to store rating field in Person class and subclasses
-
Alternative 1 (current choice): Add the rating field to all four constructors (
Person,Staff,Maintainer,Supplier).- Pros: Leverages inheritance, thus reducing repeated code and adheres to OOP.
- Cons: Changing the constructors of the four classes is a tedious task.
-
Alternative 2: Add the rating field to the parent person constructor and use a setter to set new ratings.
- Pros: Much simpler implementation that will require less refactoring of code.
- Cons: Violates OOP, specifically encapsulation as the other classes would be able to manipulate the
ratings of
Personobjects directly.
Pin and Unpin features
Overview
The pin and unpin commands enable users to pin and unpin any existing contacts in PoochPlanner.
The following sequence diagram models the interactions between the different components of PoochPlanner for the execution of the pin command:
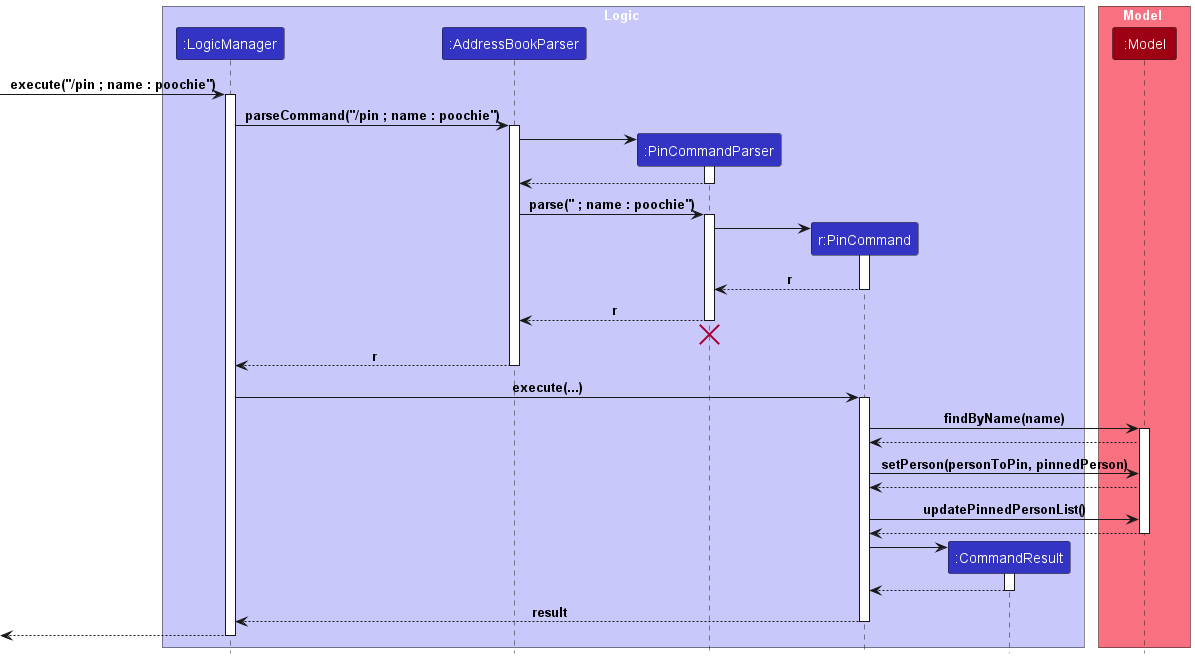
The following sequence diagram models the interactions between the different components of PoochPlanner for the execution of the unpin command:
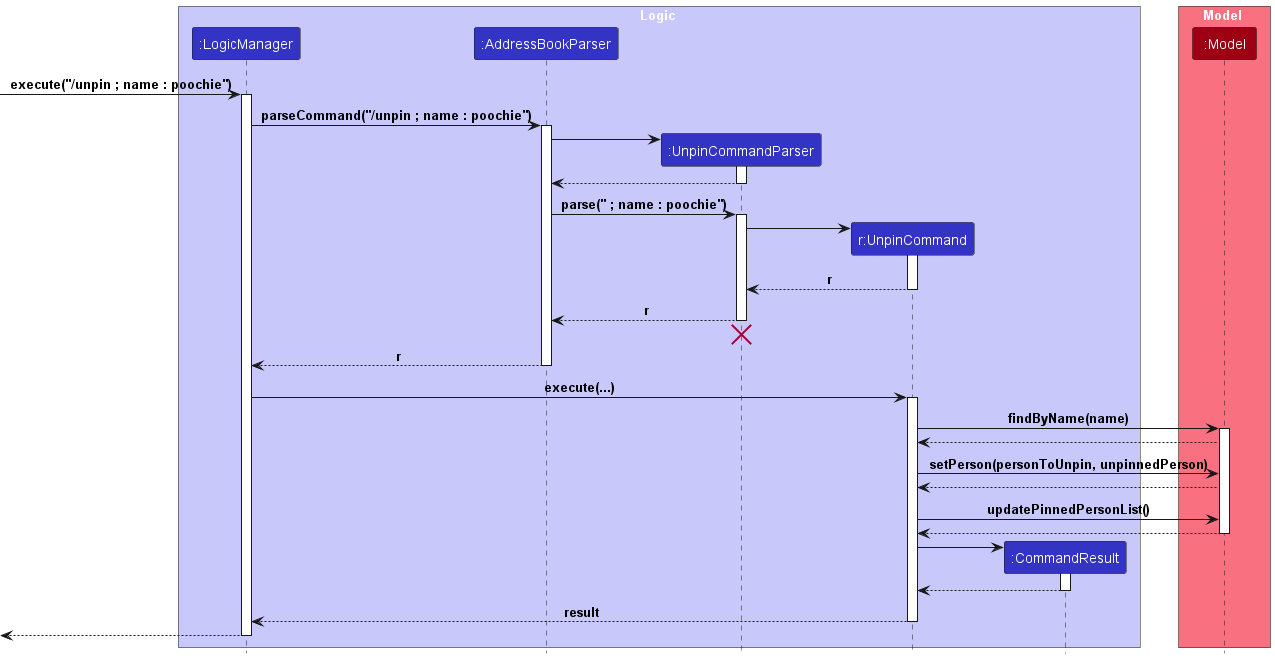
Note: The implementation for pinning and unpinning Person, Staff, Supplier, Maintainer are the same. The pin and unpin commands are also implemented similarly as seen in the sequence diagrams above.
Details
- The user inputs the command to pin/unpin a specified contact by stating the target name of the contact that they want to pin/unpin.
- A
PinCommandParser/UnpinCommandParserobject invokes itsparsemethod which parses the user input by storing the prefixes and their respective values as anArgumentMultimapobject. - A
PinCommand/UnpinCommandobject is created with the name of the contact to pin/unpin. - The
PinCommandParser/UnpinCommandParserobject returns thePinCommand/UnpinCommandobject. - A
LogicManagerobject invokes theexecutemethod of thePinCommand/UnpinCommandobject. - The
executemethod of thePinCommand/UnpinCommandobject finds the specified contact by its name. TheupdateToPinned/updateToUnpinnedmethod of the foundPersonobject creates a newPersonobject that contains the updatedpinboolean of the contact. - The
executemethod of thePinCommand/UnpinCommandobject invokes thesetPersonmethod of itsModelargument to replace the specified contact with the newPersonobject. - The
executemethod of thePinCommand/UnpinCommandobject invokes theupdatePinnedPersonListmethod of itsModelargument to update the view of PoochPlanner to show all contacts. - The
executemethod of thePinCommand/UnpinCommandobject returns aCommandResultobject which stores the data regarding the completion of thepin/unpincommand.
Example Usage
- The user launches the application.
- The user inputs
/pin ; name : Alice Tanor/unpin ; name : Alice Taninto the CLI. - The contact card for the contact named “Alice Tan” is now pinned/unpinned. This change should be reflected in the contacts list in PoochPlanner.
Aspect: How to implement pin/unpin command
-
Alternative 1 (current choice): Accept multiple name fields, where only the last name field will be taken.
- Pros: More user-friendly. Should users make a mistake, they can easily append another name field without deleting the previous name field entered.
- Cons: Less rigorous validation check on name as users may not intentionally enter a second name field.
-
Alternative 2: Accept only one name field.
- Pros: Less prone to possible errors due to stricter validation checks on name fields.
- Cons: Less user-friendly since users will have to put in more effort to fix their commands.
Sort feature
Overview
The sort command enables users to sort contacts in PoochPlanner by a contact field.
The following sequence diagram models the interactions between the different components of PoochPlanner for the execution of the sort command:
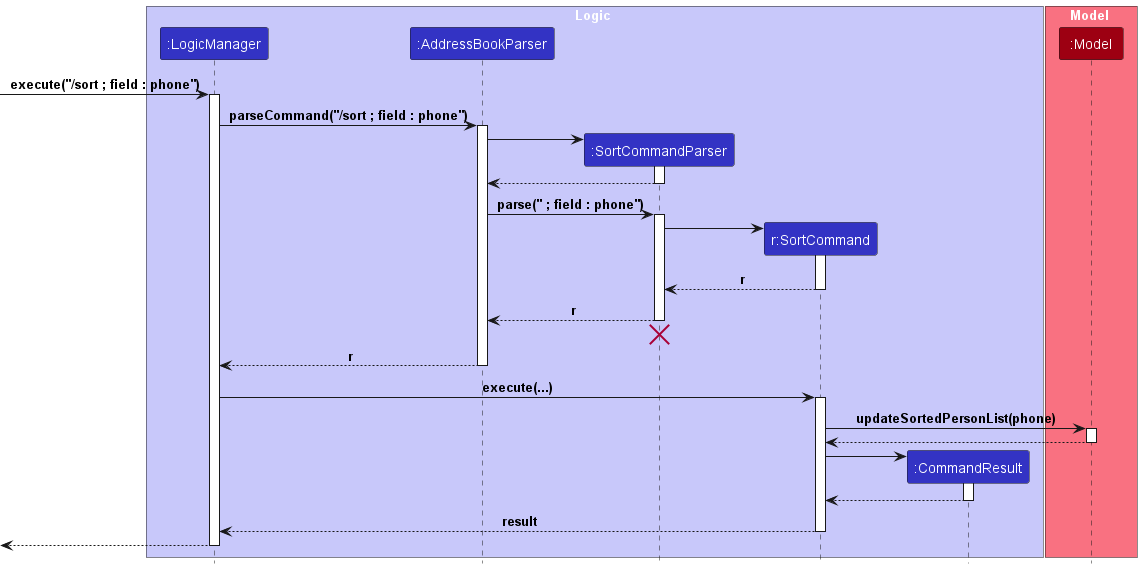
Details
- The user inputs the command to sort contacts with the target field.
- A
SortCommandParserobject invokes itsparsemethod which parses the user input throughArgumentMultimapandmapName, creating a newPrefixobject. - The
SortCommandParserobject then creates a newSortCommandobject with the targetprefix, returning this object. - A
LogicManagerobject invokes theexecutemethod of theSortCommandobject. - The
executemethod of theSortCommandobject invokes theupdateSortedPersonListmethod of itsModelargument with the targetprefixto update the view of PoochPlanner to sort all contacts by the target field. - The
executemethod of theSortCommandobject returns aCommandResultobject which stores the data regarding the completion of thesortcommand.
Example Usage
- The user launches the application.
- The user inputs
/sort ; field : phoneinto the CLI. - PoochPlanner is updated to sort all the contact cards by phone number in ascending order. This change should be reflected in the contacts list in PoochPlanner.
Aspect: How to implement sort command
-
Alternative 1 (current choice): Sorts only by ascending order, alphabetically and numerically (except ratings, which are sorted in descending order).
- Pros: Straightforward to input command. Users can just key in the field they want to sort by without having to indicate whether to sort either in ascending or descending order.
- Cons: Less flexible in sorting as later alphabets and larger values will take longer to find.
-
Alternative 2: Sorts by both ascending and descending order depending on user indication.
- Pros: More flexible in sorting for users to sort in either way to find what they need.
- Cons: Longer command, another field required to specify either ascending or descending sorting order.
Note feature
Overview
The note command enables users to add notes to existing contacts in PoochPlanner.
The following sequence diagram models the interactions between the different components of PoochPlanner for the execution of the note command.
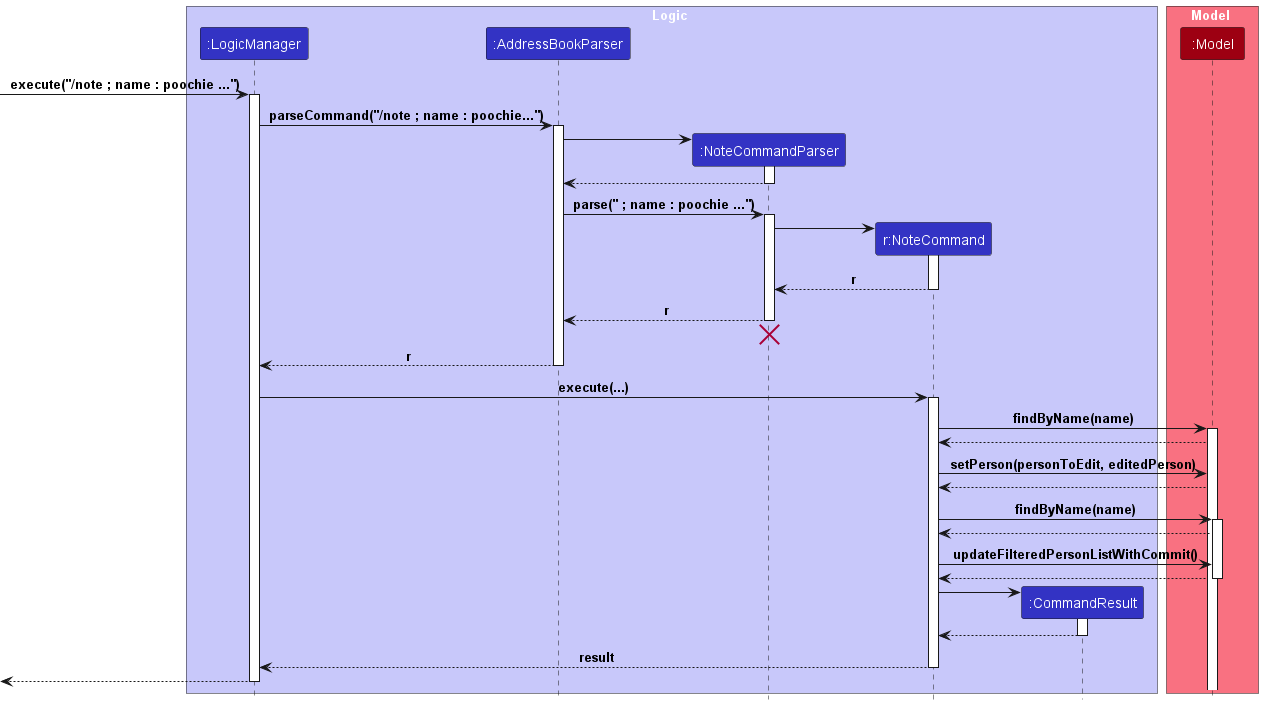
Details
- The user inputs the command to add a note to a specified contact by first stating the name of the contact they want to add a note to. This is followed by the note and an optional deadline prefixes and their respective values.
- A
NoteCommandParserobject invokes itsparsemethod which parses the user input by storing the prefixes and their respective values as anArgumentMultimapobject. - A
NoteCommandobject is created with the parsed name, note and optional deadline field. - The
NoteCommandParserobject returns theNoteCommandobject. - A
LogicManagerobject invokes theexecutemethod of theNoteCommandobject. - The
executemethod of theNoteCommandobject invokes thefindByNamemethod of itsModelargument to find the person with the specified name. - The
executemethod of theNoteCommandobject invokes thesetPersonmethod of itsModelargument to set the person in the existing contacts list to the newPersonobject which has been edited by theexecutemethod of theNoteCommandobject. - The
executemethod of theNoteCommandobject invokes theupdateFilteredPersonListmethod of itsModelargument to update the view of PoochPlanner to show all contacts. - The
executemethod of theNoteCommandobject returns aCommandResultobject which stores the data regarding the completion of thenotecommand.
Example Usage
- The user launches the application.
- The user inputs
/note ; name : Janna ; note : get kibbleinto the CLI. - The given note will be added to the description of the contact with the given name. This change should be reflected in the contacts list in PoochPlanner.
Aspect: How to store note field in Person class and subclasses
-
Alternative 1 (current choice): Add note field to all four constructors (
Person,Staff,Maintainer,Supplier).- Pros: Leverages inheritance, thus reducing repeated code and adheres to OOP.
- Cons: Changing the constructors of the four classes is a tedious task.
-
Alternative 2: Add note field to the parent person constructor and use a setter to set new notes.
- Pros: Much simpler implementation that will require less refactoring of code.
- Cons: Violates OOP, specifically encapsulation as the other classes would be able to manipulate the
inner details of
Personobjects directly.
Undo and redo features
Overview
The undo and redo commands enable users to undo and redo previous actions made in PoochPlanner.
As the implementation of the undo and redo commands are more complicated, the mechanism is fully explained with the corresponding implementation as described below.
Implementation
The undo/redo mechanism is facilitated by the VersionedAddressBook class. It extends the AddressBook class with an additional undo/redo history, stored internally with the addressBookStateList and currentStatePointer properties. Additionally, it supports the following operations:
-
VersionedAddressBook#commit()— Saves the current address book state in its history. -
VersionedAddressBook#undo()— Restores the previous address book state from its history. -
VersionedAddressBook#redo()— Restores a previously undone address book state from its history.
These operations are exposed in the Model interface as Model#commitAddressBook(), Model#undoAddressBook() and Model#redoAddressBook() respectively.
Given below is an example usage scenario and how the undo/redo mechanism behaves at each step.
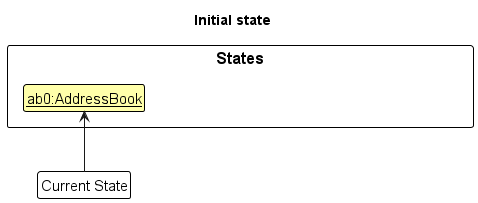
Step 1. The user launches the application for the first time. A VersionedAddressBook object will be initialized with an initial AddressBook state, with the currentStatePointer pointer pointing to that single address book state.
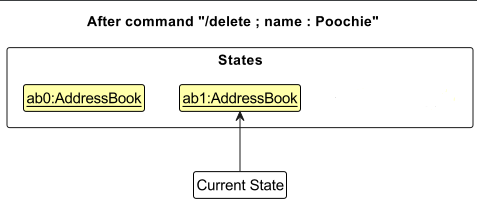
Step 2. The user executes the /delete ; name : Poochie command to delete the contact named “Poochie” from PoochPlanner. The delete command calls the Model#commitAddressBook() method, causing the modified state of the address book after the /delete ; name : Poochie command executes to be saved in the addressBookStateList property, and the currentStatePointer pointer is shifted to the newly inserted address book state.
Step 3. The user executes /add-person ; name : John … to add a new contact named “John”. The add-person command also calls the Model#commitAddressBook() method, causing another modified address book state to be saved into the addressBookStateList property.
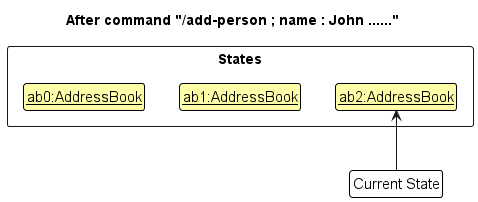
Note: If a command fails during its execution, it will not call the Model#commitAddressBook() method, and consequently the address book state will not be saved into the addressBookStateList property.
Step 4. The user now decides that adding John was a mistake, and decides to undo that action by executing the undo command. The undo command will call the Model#undoAddressBook() method, which will shift the currentStatePointer pointer once to the left, pointing it to the previous address book state, and restores the address book to that state.
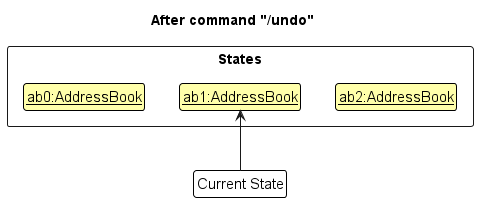
Note: If the currentStatePointer pointer is at index 0 (pointing to the initial address book state), then there are no previous address book states to restore. The undo command calls the Model#canUndoAddressBook() method to check if this is the case. If so, it will return an error to the user rather
than attempt to perform the undo.
The following sequence diagram shows how an undo operation goes through the Logic component:
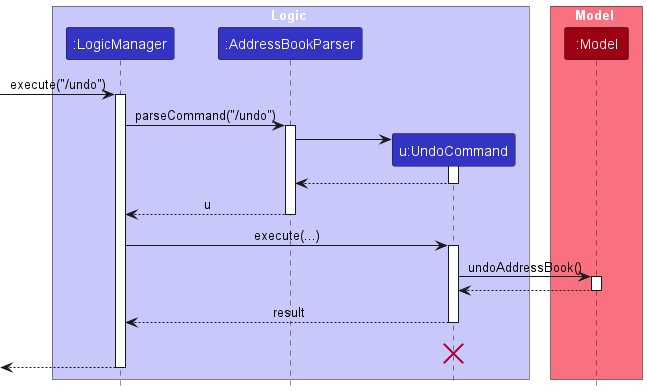
Note: The lifeline for the UndoCommand object should end at the destroy marker (X) but due to a limitation of PlantUML, the lifeline reaches the end of diagram.
Similarly, how an undo operation goes through the Model component is shown below:
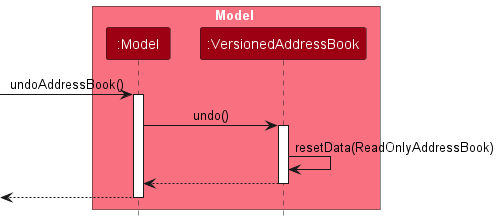
The redo command does the opposite — it calls the Model#redoAddressBook() method, which shifts the currentStatePointer pointer once to the right, pointing to the previously undone state, and restores the address book to that state.
Note: If the currentStatePointer pointer is at index addressBookStateList.size() - 1 (pointing to the latest address book state), then there are no undone address book states to restore. The redo command calls the Model#canRedoAddressBook() method to check if this is the case. If so, it will return an error to the user rather than attempt to perform the redo.
Step 5. The user then decides to execute the list command. Commands that do not modify the address book, such as list, will not call the Model#commitAddressBook() method. Thus, the addressBookStateList property remains unchanged.
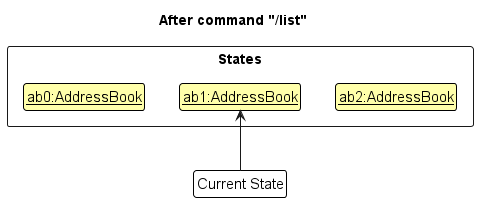
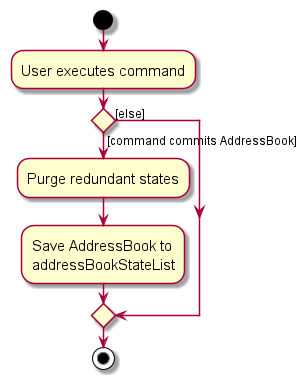
Step 6. The user executes the clear command, which calls the Model#commitAddressBook() method. Since the currentStatePointer pointer is not pointing at the end of the addressBookStateList property, all address book states after the currentStatePointer property will be purged (reason: It no longer makes sense to redo the /add-person ; name : John... command). This is the behavior that most modern desktop applications follow.
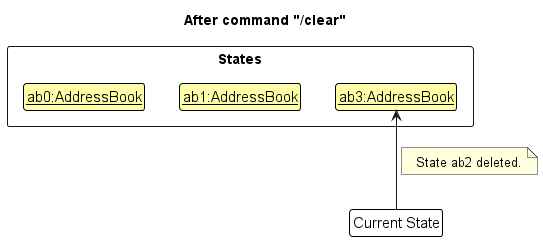
The following activity diagram summarizes what happens when a user executes a new command:
Design considerations:
Aspect: How undo and redo executes:
Alternative 1 (current choice): Save snapshots of the entire address book in individual states (store a revision history).
- Pros: Easy to implement.
- Cons: May have performance issues in terms of memory usage.
Alternative 2: Implement inverse commands (commands that are antagonistic in nature).
- Pros: Significant reduction in memory overhead.
- Cons: Not all commands have an inverse (e.g. the
sortcommand is not a bijection and hence no single function exists as its inverse).
Help feature
Overview
The help command enables users to view help for all commands.
The following sequence diagram models the interactions between the different components of PoochPlanner for the execution of the help command:
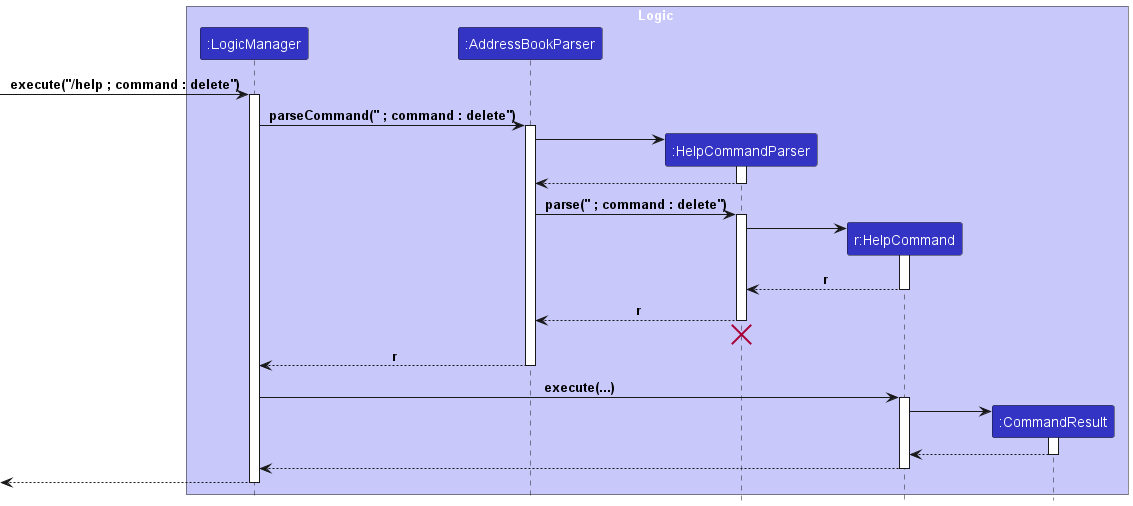
Details
- The user inputs the command to view help for a specific command. This is followed by the command field specifying the command they want to view help for.
- A
HelpCommandParserobject invokes itsparsemethod which parses the user input by storing the prefix of its respective values as anArgumentMultimapobject. - A
HelpCommandobject is created with the command type that was specified in the command field. - The
HelpCommandParserobject returns theHelpCommandobject. - A
LogicManagerobject invokes theexecutemethod of theHelpCommandobject. - The
executemethod of theHelpCommandobject returns aCommandResultobject which stores the data regarding the completion of thehelpcommand.
Example Usage
- The user launches the application.
- The user inputs
/help ; command : deleteinto the CLI. - Help for the
deletecommand will be displayed.
Aspect: How to display different help command windows
-
Alternative 1 (current choice): Use only one help window class to display different help messages for different commands. Different content is displayed by passing in different strings.
- Pros: Code is made much more concise.
- Cons: Lengthy if-else statements are required to display the correct string.
-
Alternative 2: Create a different help window class for each type of command.
- Pros: All details relating to a single command is within its own file. Can be perceived as neater.
- Cons: Highly repetitive code. Even small mistakes made would have to be fixed in over ten windows.
Remind feature
Overview
The remind command enables users to view all contacts with note deadlines from today onwards.
The following sequence diagram models the interactions between the different components of PoochPlanner for the execution of the remind command:
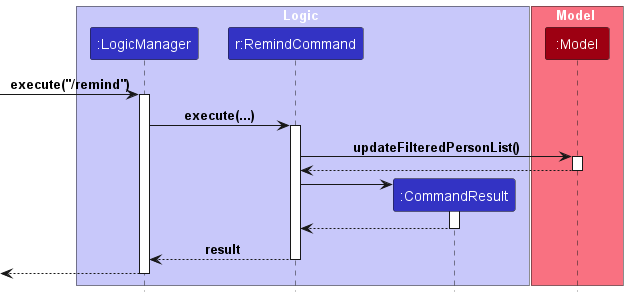
Details
- The user inputs the command to view reminders.
- A
RemindCommandobject is created. - A
LogicManagerobject invokes theexecutemethod of theRemindCommandobject. - The
executemethod of theRemindCommandobject invokes theupdateFilteredPersonListmethod of itsModelargument to update the view of the application to show contacts with note deadlines from today onwards. - The
executemethod of theRemindCommandobject returns aCommandResultobject which stores the data regarding the completion of theremindcommand.
Example Usage
- The user launches the application.
- The user inputs
/remindinto the CLI. - Contacts that have deadline notes from today onwards will be displayed.
Clear feature
Overview
The clear command enables users to remove all existing contacts from PoochPlanner.
The following sequence diagram models the interactions between the different components of PoochPlanner for the execution of the clear command:
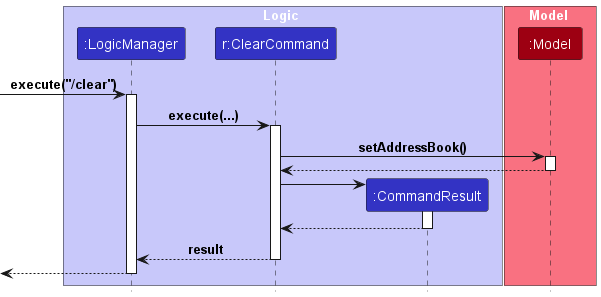
Details
- The user inputs the command to clear all contacts.
- A
LogicManagerobject invokes theexecutemethod of aClearCommandobject. - The
executemethod of theClearCommandobject invokes thesetAddressBookmethod of itsModelargument with a newAddressBookobject which contains an emptyUniquePersonListproperty. - The
executemethod of theClearCommandobject returns aCommandResultobject which stores the data regarding the completion of theclearcommand.
Example Usage
- The user launches the application.
- The user inputs
/clearinto the CLI. - The data in PoochPlanner is emptied.
List feature
Overview
The list command enables users to view all existing contacts from PoochPlanner.
The following sequence diagram models the interactions between the different components of PoochPlanner for the execution of the list command:
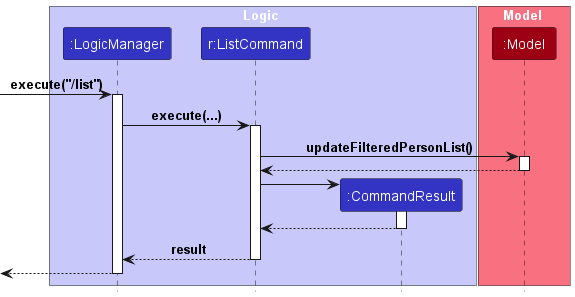
Details
- The user inputs the command to list all contacts.
- A
LogicManagerobject invokes theexecutemethod of aListCommandobject. - The
executemethod of theListCommandobject invokes theupdateFilteredPersonListmethod of itsModelargument to update the view of the application to show all contacts. - The
executemethod of theListCommandobject returns aCommandResultobject which stores the data regarding the completion of thelistcommand.
Example Usage
- The user launches the application.
- The user inputs
/listinto the CLI. - All contacts in PoochPlanner are displayed.
Documentation, logging, testing, configuration, dev-ops
Appendix: Requirements
Product scope
Target user profile:
- Dog cafe owners who need to manage a team of staff, F&B vendors, and a dog maintenance team.
- Users who prefer typing to other forms of input and who are comfortable using CLI applications.
Value proposition: PoochPlanner is a desktop application to track details of various groups (Person, Supplier, Maintainer, Staff) that dog cafe owners have to regularly interact with. The app is optimized for use using a Command Line Interface (CLI) while still encompassing a user-friendly Graphical User Interface (GUI).
User stories
Priorities: High (must have) - * * *, Medium (nice to have) - * *, Low (unlikely to have) - *
| Priority | As a … | I want to … | So that I can… |
|---|---|---|---|
* * * |
well connected user | add new contacts to my contacts list | have the contacts of new acquaintances in my contacts list |
* * * |
cafe owner user | edit my contacts in my contacts list | update contact information such as the new phone number of my contacts |
* * * |
cafe owner user | delete contacts | remove outdated contacts such as retrenched staff |
* * * |
well connected user | search through my long list of contacts by different specified fields | find my contacts efficiently |
* * * |
first-time user | get help about what commands to use | easily know how to navigate the system |
* * |
profit-maximising user | sort vendors in ascending order of price | view the vendors selling the cheapest products easily |
* * |
careless user | undo my commands | revert my accidental commands easily |
* * |
careless user | redo my commands | revert my accidental undo commands easily |
* * |
well connected user | pin my contacts in my contacts list | easily view important contacts |
* * |
well connected user | unpin my contacts in my contacts list | remove my less important contacts from the top of my list |
* * |
profit-maximising user | rate the efficiency of contacts | view the efficiency of my contacts easily and only conduct business with efficient contacts |
* * |
forgetful user | note down all details about my contacts | track and remember important details and deadlines easily |
* * |
forgetful user | be reminded of my deadlines | complete all my tasks on time |
Use cases
System: PoochPlanner
Use case: UC01 - Adding a contact
Actor: User
Guarantee: If MSS reaches step 3, a new contact is added into the contacts list.
MSS:
- User requests to add the contact of a contact.
- PoochPlanner updates the contacts list.
-
PoochPlanner confirms the successful addition.
Use case ends.
Extensions:
- 1a. PoochPlanner detects a missing field in the entered input.
- 1a1. PoochPlanner displays the error message.
- 1a2. User re-enters a new command with the required field.
- Steps 1a1 - 1a2 are repeated until the input entered is correct.
- Use case resumes from step 2.
- 1b. PoochPlanner detects a duplicate name entry.
- 1b1. PoochPlanner displays the error message.
- 1b2. User re-enters a new command with another name.
- Steps 1b1 - 1b2 are repeated until there are no duplicate entries in the input.
- Use case resumes from step 2.
- 1c. PoochPlanner detects an invalid address format.
- 1c1. PoochPlanner displays the error message.
- 1c2. User re-enters a new command with a correct address format.
- Steps 1c1 - 1c2 are repeated until there is no error with the input.
- Use case resumes from step 2.
- 1d. PoochPlanner detects an invalid email format.
- 1d1. PoochPlanner displays the error message.
- 1d2. User re-enters a new command with a correct email format.
- Steps 1d1 - 1d2 are repeated until there is no error with the input.
- Use case resumes from step 2.
- 1e. PoochPlanner detects an invalid input for employment.
- 1e1. PoochPlanner displays the error message.
- 1e2. User re-enters a new command with correct input for employment.
- Steps 1e1 - 1e2 are repeated until there is no error with the input.
- Use case resumes from step 2.
- 1f. PoochPlanner detects an invalid phone format.
- 1f1. PoochPlanner displays the error message.
- 1f2. User re-enters a new command with a correct phone format.
- Steps 1f1 - 1f2 are repeated until there are no errors with the input.
- Use case resumes from step 2.
- 1g. PoochPlanner detects an invalid salary format.
- 1g1. PoochPlanner displays the error message.
- 1g2. User re-enters a new command with a correct price format.
- Steps 1g1 - 1g2 are repeated until there are no errors in input.
- Use case resumes from step 2.
- 1h. PoochPlanner detects an invalid price format.
- 1h1. PoochPlanner displays the error message.
- 1h2. User re-enters a new command with a correct price format.
- Steps 1h1 - 1h2 are repeated until there are no errors with the input.
- Use case resumes from step 2.
- 1i. PoochPlanner detects an invalid note format.
- 1i1. PoochPlanner displays the error message.
- 1i2. User re-enters a new command with a correct note format.
- Steps 1i1 - 1i2 are repeated until there are no errors with the input.
- Use case resumes from step 2.
- 1j. PoochPlanner detects an invalid rating format.
- 1j1. PoochPlanner displays the error message.
- 1j2. User re-enters a new command with a correct rating format.
- Steps 1j1 - 1j2 are repeated until there are no errors with the input.
- Use case resumes from step 2.
- 1k. PoochPlanner detects an invalid product format.
- 1k1. PoochPlanner displays the error message.
- 1k2. User re-enters a new command with a correct product format.
- Steps 1k1 - 1k2 are repeated until there are no errors with the input.
- Use case resumes from step 2.
- 1l. PoochPlanner detects an invalid commission format.
- 1l1. PoochPlanner displays the error message.
- 1l2. User re-enters a new command with a correct commission format.
- Steps 1l1 - 1l2 are repeated until there are no errors with the input.
- Use case resumes from step 2.
- 1m. PoochPlanner detects an invalid skill format.
- 1m1. PoochPlanner displays the error message.
- 1m2. User re-enters a new command with a correct skill format.
- Steps 1m1 - 1m2 are repeated until there are no errors with the input.
- Use case resumes from step 2.
- 1n. PoochPlanner detects an invalid name format.
- 1n1. PoochPlanner displays the error message.
- 1n2. User re-enters a new command with a correct name format.
- Steps 1n1 - 1n2 are repeated until there are no errors with the input.
- Use case resumes from step 2.
System: PoochPlanner
Use case: UC02 - Editing a contact
Actor: User
Guarantee: If MSS reaches step 3, the contact is successfully edited in the contacts list.
MSS:
- User requests to edit the field of a contact.
- PoochPlanner updates the field of specified contact.
-
PoochPlanner confirms the successful edit.
Use case ends.
Extensions:
- 1a. PoochPlanner detects a missing name field in the entered input.
- 1a1. PoochPlanner displays the error message.
- 1a2. User re-enters a new command with the name field.
- Steps 1a1 - 1a2 are repeated until the input entered is correct.
- Use case resumes from step 2.
- 1b. PoochPlanner is unable to find the contact.
- 1b1. PoochPlanner displays the error message.
- 1b2. User re-enters a new command with another name.
- Steps 1b1 - 1b2 are repeated until the input references a contact that exists in PoochPlanner.
- Use case resumes from step 2.
- 1c. PoochPlanner detects an unknown input for employment.
- 1c1. PoochPlanner displays the error message.
- 1c2. User re-enters a new command with correct input for employment.
- Steps 1c1 - 1c2 are repeated until there are no errors with the input.
- Use case resumes from step 2.
- 1d. PoochPlanner detects empty field in the entered input.
- 1d1. PoochPlanner displays the error message.
- 1d2. User re-enters a new command and specifies the field(s) to edit.
- Steps 1d1 - 1d2 are repeated until a valid field is specified.
- Use case resumes from step 2.
- 1e. User specifies an invalid field.
- 1e1. PoochPlanner displays the error message.
- 1e2. User re-enters a new command with a correct field format.
- Steps 1e1 - 1e2 are repeated until a valid field is specified.
- Use case resumes from step 2.
- 1f. PoochPlanner detects an invalid email format.
- 1f1. PoochPlanner displays the error message.
- 1f2. User re-enters a new command with a correct email format.
- Steps 1f1 - 1f2 are repeated until there are no errors with the input.
- Use case resumes from step 2.
- 1g. PoochPlanner detects an invalid phone format.
- 1g1. PoochPlanner displays the error message.
- 1g2. User re-enters a new command with a correct phone format.
- Steps 1g1 - 1g2 are repeated until there are no errors with the input.
- Use case resumes from step 2.
- 1h. PoochPlanner detects an invalid salary format.
- 1h1. PoochPlanner displays the error message.
- 1h2. User re-enters a new command with a correct salary format.
- Steps 1h1 - 1h2 are repeated until there are no errors with the input.
- Use case resumes from step 2.
- 1i. PoochPlanner detects an invalid price format.
- 1i1. PoochPlanner displays the error message.
- 1i2. User re-enters a new command with a correct price format.
- Steps 1i1 - 1i2 are repeated until there are no errors with the input.
- Use case resumes from step 2.
- 1j. PoochPlanner detects an invalid address format.
- 1j1. PoochPlanner displays the error message.
- 1j2. User re-enters a new command with a correct address format.
- Steps 1j1 - 1j2 are repeated until there are no errors with the input.
- Use case resumes from step 2.
- 1k. PoochPlanner detects an invalid commission format.
- 1k1. PoochPlanner displays the error message.
- 1k2. User re-enters a new command with a correct commission format.
- Steps 1k1 - 1k2 are repeated until there are no errors with the input.
- Use case resumes from step 2.
- 1l. PoochPlanner detects an invalid product format.
- 1l1. PoochPlanner displays the error message.
- 1l2. User re-enters a new command with a correct product format.
- Steps 1l1 - 1l2 are repeated until there are no errors with the input.
- Use case resumes from step 2.
- 1m. PoochPlanner detects an invalid name format.
- 1m1. PoochPlanner displays the error message.
- 1m2. User re-enters a new command with a correct name format.
- Steps 1m1 - 1m2 are repeated until there are no errors with the input.
- Use case resumes from step 2.
- 1n. PoochPlanner detects an invalid skill format.
- 1n1. PoochPlanner displays the error message.
- 1n2. User re-enters a new command with a correct skill format.
- Steps 1n1 - 1n2 are repeated until there are no errors with the input.
- Use case resumes from step 2.
System: PoochPlanner
Use case: UC03 - Searching for a contact
Actor: User
Guarantee: If MSS reaches step 3, the contacts list is filtered successfully.
MSS:
- User requests to search for the contact of a person with a keyword for a specified field.
- PoochPlanner confirms successful search.
-
PoochPlanner returns the filtered list of contacts that matches the keyword as specified by the user.
Use case ends.
Extensions:
- 1a. PoochPlanner detects a missing field in the entered input.
- 1a1. PoochPlanner displays the error message.
- 1a2. User re-enters a new command with a specified field.
- Steps 1a1 - 1a2 are repeated until a valid field is entered by the user.
- Use case resumes from step 2.
- 1b. PoochPlanner detects duplicate fields in the entered input.
- 1b1. PoochPlanner displays the error message.
- 1b2. User re-enters a new command with a specified field.
- Steps 1b1 - 1b2 are repeated until the command does not contain any duplicate fields.
- Use case resumes from step 2.
System: PoochPlanner
Use case: UC04 - Deleting a contact
Actor: User
Guarantee: If MSS reaches step 3, the contact is deleted from the contacts list.
MSS:
- User requests to delete a contact.
- PoochPlanner removes the contact and updates the contacts list.
-
PoochPlanner confirms the successful deletion.
Use case ends.
Extensions:
- 1a. PoochPlanner detects a missing name field in the entered input.
- 1a1. PoochPlanner displays the error message.
- 1a2. User re-enters a new command with the name field.
- Steps 1a1 - 1a2 are repeated until the input entered is correct.
- Use case resumes from step 2.
- 1b. PoochPlanner is unable to find the contact.
- 1b1. PoochPlanner displays the error message.
- 1b2. User re-enters a new command with another name.
- Steps 1b1 - 1b2 are repeated until the input name matches a contact name that exists in PoochPlanner.
- Use case resumes from step 2.
System: PoochPlanner
Use case: UC05 - Rating a contact
Actor: User
Guarantee: If MSS reaches step 3, a rating for the contact is updated successfully in the contacts list.
MSS:
- User requests to rate a contact with the specified rating.
- PoochPlanner updates the contact rating with the rating provided.
-
PoochPlanner confirms the successful rating of the contact.
Use case ends.
Extensions:
- 1a. PoochPlanner detects a missing name in the entered input.
- 1a1. PoochPlanner displays the error message.
- 1a2. User re-enters a new command with a specified name.
- Steps 1a1 - 1a2 are repeated until a valid name is input by the User.
- Use case resumes from step 2.
- 1b. PoochPlanner detects an invalid name in the entered input.
- 1b1. PoochPlanner displays the error message.
- 1b2. User re-enters a new command with a specified name.
- Steps 1b1 - 1b2 are repeated until a valid name is input by the User.
- Use case resumes from step 2.
- 1c. PoochPlanner detects a missing rating in the entered input.
- 1c1. PoochPlanner displays the error message.
- 1c2. User re-enters a new command with a new rating value.
- Steps 1c1 - 1c2 are repeated until the rating provided is an integer between 0 and 5 inclusive.
- Use case resumes from step 2.
- 1d. PoochPlanner detects an invalid rating in the entered input.
- 1d1. PoochPlanner displays the error message.
- 1d2. User re-enters a new command with a new rating value.
- Steps 1d1 - 1d2 are repeated until the rating provided is an integer between 0 and 5 inclusive.
- Use case resumes from step 2.
System: PoochPlanner
Use case: UC06 - Pinning a contact
Actor: User
Guarantee: If MSS reaches step 3, the user has successfully pinned the contact.
MSS:
- User requests to pin a contact.
- The specified contact is pinned successfully.
-
PoochPlanner displayed the contacts list with the pinned contacts at the top.
Use case ends.
- 1a. PoochPlanner detects a missing name field in the entered input.
- 1a1. PoochPlanner displays the error message.
- 1a2. User re-enters a new command with a specified name field.
- Steps 1a1 - 1a2 are repeated until the input entered is correct.
- Use case resumes from step 2.
- 1b. PoochPlanner detects an invalid name field in the entered input.
- 1b1. PoochPlanner displays the error message.
- 1a2. User re-enters a new command with a specified name field.
- Steps 1b1 - 1b2 are repeated until the input entered is correct.
- Use case resumes from step 2.
- 1c. PoochPlanner fails to find the person.
- 1c1. PoochPlanner displays the error message.
- 1c2. User re-enters a new command with another name.
- Steps 1c1 - 1c2 are repeated until the input name matches a contact name that exists in PoochPlanner.
- Use case resumes from step 2.
System: PoochPlanner
Use case: UC07 - Unpinning a contact
Actor: User
Guarantee: If MSS reaches step 3, the user has successfully unpinned the contact.
MSS:
- User requests to unpin a contact.
- The specified contact is unpinned successfully.
-
PoochPlanner updates the contacts list with the remaining pinned contacts at the top.
Use case ends.
Extensions:
- 1a. PoochPlanner detects a missing name field in the entered input.
- 1a1. PoochPlanner displays the error message.
- 1a2. User re-enters a new command with a specified name field.
- Steps 1a1 - 1a2 are repeated until the input entered is correct.
- Use case resumes from step 2.
- 1b. PoochPlanner detects an invalid name field in the entered input.
- 1b1. PoochPlanner displays the error message.
- 1b2. User re-enters a new command with a specified name field.
- Steps 1b1 - 1b2 are repeated until the input entered is correct.
- Use case resumes from step 2.
- 1c. PoochPlanner fails to find the person.
- 1c1. PoochPlanner displays the error message.
- 1c2. User re-enters a new command with another name.
- Steps 1c1 - 1c2 are repeated until the input name matches a contact name that exists in PoochPlanner.
- Use case resumes from step 2.
System: PoochPlanner
Use case: UC08 - Sorting the contacts list
Actor: User
Guarantee: If MSS reaches step 3, the user has successfully sorted the contacts list by a specified field.
MSS:
- User requests to sort PoochPlanner by a specified field.
- PoochPlanner updates the contacts list in the sorted order.
-
PoochPlanner confirms that the contacts list has been successfully sorted.
Use case ends.
Extensions:
- 1a. PoochPlanner detects a missing field in the entered input.
- 1a1. PoochPlanner displays the error message.
- 1a2. User re-enters a new command with a specified name.
- Steps 1a1 - 1a2 are repeated until a valid name is input by the User.
- Use case resumes from step 2.
- 1b. PoochPlanner detects an invalid field in the entered input.
- 1b1. PoochPlanner displays the error message.
- 1b2. User re-enters a new command with a specified name.
- Steps 1b1 - 1b2 are repeated until a valid field is input by the User.
- Use case resumes from step 2.
System: PoochPlanner
Use case: UC09 - Adding a note to a contact
Actor: User
Guarantee: If MSS reaches step 3, a note for the contact specified is updated successfully in the contacts list.
MSS:
- User requests to add a note to the contact.
- PoochPlanner updates the contact with the specified note.
-
PoochPlanner confirms that the note has been successfully added.
Use case ends.
Extensions:
- 1a. PoochPlanner detects a missing name in the entered input.
- 1a1. PoochPlanner displays the error message.
- 1a2. User re-enters a new command with name value.
- Steps 1a1 - 1a2 are repeated until a valid name value is input by the user.
- Use case resumes from step 2.
- 1b. PoochPlanner detects an invalid name in the entered input.
- 1b1. PoochPlanner displays the error message.
- 1b2. User re-enters a new command with a new name value.
- Steps 1b1 - 1b2 are repeated until a valid name value is input by the user.
- Use case resumes from step 2.
- 1c. PoochPlanner detects a missing note in the entered input.
- 1c1. PoochPlanner displays the error message.
- 1c2. User re-enters a new command with a note value.
- Steps 1c1 - 1c2 are repeated until the note value is provided (non-null/non-empty).
- Use case resumes from step 2.
- 1d. PoochPlanner detects an invalid note in the entered input.
- 1d1. PoochPlanner displays the error message.
- 1d2. User re-enters a new command with a new note value.
- Steps 1d1 - 1d2 are repeated until the note provided is valid (non-null/non-empty).
- Use case resumes from step 2.
System: PoochPlanner
Use case: UC10 - Adding a deadline note to a contact
Actor: User
Guarantee: If MSS reaches step 3, a note with a deadline for the specified contact will be updated successfully in the contacts list.
MSS:
- User requests to add a deadline note to the contact.
- PoochPlanner updates the contact with the specified deadline note.
-
PoochPlanner confirms that the deadline note has been successfully added.
Use case ends.
Extensions:
- 1a. PoochPlanner detects a missing name in the entered input.
- 1a1. PoochPlanner displays the error message.
- 1a2. User re-enters a new command with a name value.
- Steps 1a1 - 1a2 are repeated until a name is input by the user.
- Use case resumes from step 2.
- 1b. PoochPlanner detects an invalid name in the entered input.
- 1b1. PoochPlanner displays the error message.
- 1b2. User re-enters a new command with a new name value.
- Steps 1b1 - 1b2 are repeated until a valid name is input by the user.
- Use case resumes from step 2.
- 1c. PoochPlanner detects a missing note in the entered input.
- 1c1. PoochPlanner displays the error message.
- 1c2. User re-enters a new command with a note value.
- Steps 1c1 - 1c2 are repeated until the a note value is provided (non-null/non-empty).
- Use case resumes from step 2.
- 1d. PoochPlanner detects an invalid note in the entered input.
- 1d1. PoochPlanner displays the error message.
- 1d2. User re-enters a new command with a new note value.
- Steps 1d1 - 1d2 are repeated until the note provided is valid (non-null/non-empty).
- Use case resumes from step 2.
- 1e. PoochPlanner detects an invalid deadline in the entered input.
- 1e1. PoochPlanner displays the error message.
- 1e2. User re-enters a new command with a new deadline value.
- Steps 1e1 - 1e2 are repeated until the deadline provided is valid (non-null/non-empty).
- Use case resumes from step 2.
System: PoochPlanner
Use case: UC11 - Undoing a command
Actor: User
Guarantee: If MSS reaches step 2, the user has successfully reverted back to the previous command.
MSS:
- User requests to undo a previous command.
-
PoochPlanner retrieves a previous record of the address book data.
Use case ends.
Extensions:
- 1a. PoochPlanner detects no previous record of the address book data.
- 1a1. PoochPlanner displays the error message.
- Use case ends.
System: PoochPlanner
Use case: UC12 - Redoing a command
Actor: User
Guarantee: If MSS reaches step 2, the user has successfully reverted back the undo command.
MSS:
- User requests to redo a previous command.
-
PoochPlanner retrieves a future record of the address book data.
Use case ends.
Extensions:
- 1a. PoochPlanner detects no future record of the address book data.
- 1a1. PoochPlanner displays the error message.
- Use case ends.
System: PoochPlanner
Use case: UC13 - Viewing help
Actor: User
Guarantee: If MSS reaches step 2, the help window for the corresponding command pops up.
MSS:
- User requests to get help about a command.
-
PoochPlanner displays help details relating to this command.
Use case ends.
Extensions:
- 1a. User requests help for an invalid command (a command that is not offered by PoochPlanner).
- 1a1. PoochPlanner displays the error message.
- 1a2. User re-enters a new command and request to learn about a new command.
- Steps 1a1 - 1a2 are repeated until a valid command is entered by the user.
- Use case resumes from step 2.
System: PoochPlanner
Use case: UC14 - Viewing reminders for the contacts list
Actor: User
Guarantee: If MSS reaches step 2, contacts will be displayed only if their note deadlines are on or after today's date.
MSS:
- User requests to receive reminders.
-
PoochPlanner displays all relevant contacts.
Use case ends.
System: PoochPlanner
Use case: UC15 - Clearing the contacts list
Actor: User
Guarantee: If MSS reaches step 3, the user has successfully cleared the contacts list.
MSS:
- User requests to clear the data in the contacts list.
- PoochPlanner updates the data in the contacts list.
-
PoochPlanner confirms that the data in the contacts list has been cleared.
Use case ends.
System: PoochPlanner
Use case: UC16 - Listing all contacts
Actor: User
Guarantee: If MSS reaches step 3, the user has successfully listed all the contacts.
MSS:
- User requests to list all contacts.
- PoochPlanner displays all relevant contacts.
-
PoochPlanner confirms that all relevant contacts has been successfully listed.
Use case ends.
Non-Functional Requirements
- PoochPlanner needs to be compatible across major operating systems, including Windows, macOS, and Linux, supporting only Java 11.
- User-managed transactions and budgets should be locally saved and backed up, ensuring restoration in subsequent sessions unless data integrity is compromised.
- Thorough documentation of all non-private methods is essential to ensure the maintainability of the codebase.
- PoochPlanner should function completely offline.
- PoochPlanner should be able to hold up to 1000 contacts without a noticeable sluggishness in performance for typical usage.
- A user with above average typing speed should be able to accomplish most of the tasks faster using commands than using the mouse.
- All code snippets presented in the developer guide shall follow a consistent coding style and formatting, adhering to the module’s coding standards and best practices.
- The developer guide shall undergo regular content audits, with outdated or deprecated information flagged for removal or revision, and new features or updates documented within one week of release.
- The system should respond within 2 seconds.
- The data should be stored locally and should not be accessible from other devices due to privacy issues.
Glossary
- PoochPlanner: An address book CLI software that stores contacts.
- Contact: A contact that is stored in PoochPlanner.
- Supplier: External suppliers that sell the logistics required for the sustenance of dog cafe operations, for example dog food, to the dog cafe owners at a fixed price.
- Staff: Employees of the dog cafe that handle the running of the cafe.
- Maintainer: Specialized external workers that take special care of and maintain the dogs.
- CLI: Command Line Interface
- GUI: Graphical User Interface
- MSS: Main Success Scenario
- JSON: JavaScript Object Notation
- API: Application Programming Interface
Appendix: Planned Enhancements
- Enhance commands to be space-insensitive
- Currently, we do not allow for incorrect spacings in commands.
-
/add-person ; name : Person1 ;phone :98883888;address:Pooch Street 32 ; email : impooch@gmail.com. - The above example will be considered as invalid since there is no spacing before the
phoneprefix and before theaddressprefix. The lack of spacing causesphoneandaddressto not be parsed as valid prefixes. - We plan to extend PoochPlanner to accept alternative possible inputs with varied spacings to cater fast typists as varied spacings are likely to occur due to typing errors
- Enhance commands to fix multiple white spacings in the user’s input
- Currently, we do not have any checker to verify if there are multiple white spacings in the user’s input.
- We take any input values
John Doewith multiple number of spacings as different inputs. - We plan to parse all inputs to remove additional spacings to cater fast typists as additional spacings are likely to occur due to typing errors.
- Enhance prices to allow for decimal places
- Currently, we do not allow prices to have decimal places.
- We plan to allow decimal places for prices to allow for greater flexibility in recording prices.
- Enhance salaries to allow for storage in different units
- Currently, we only allow storing hourly salaries with the unit
/hr. - We plan to allow for more flexible units such as
/day,/monthand/event.
- Currently, we only allow storing hourly salaries with the unit
- Enhance validation on input fields for search command
- Currently, we do not have any validation on input fields such as salary and phone in search commands.
- If users insert a random word in the salary field, the execution will not throw any error.
- We plan to do validation checks on all fields to ensure that users are inserting the correct type of value in the field.
- Enhance post-search status
- Currently, after a search command, the contact book will only display the filtered contacts list.
- Execution of delete, pin, unpin, undo and redo will not return to the full contacts list.
- We plan to enhance the commands by returning to the full list after every command execution.
- Enhance commissions to allow for decimal places
- Currently, we do not allow commissions to have decimal places.
- We plan to allow decimal places for commissions to allow for greater flexibility in recording commissions.
- Enhance commissions to allow for storage in different units
- Currently, we only allow storing hourly commissions with the unit
/hr. - We plan to allow for more flexible units such as
/day,/monthand/event.
- Currently, we only allow storing hourly commissions with the unit
- Enhance phone number storage
- Currently, we only allow users to add one phone number to one contact.
- We plan to allow users to add more than one phone number to allow for greater flexibility in storing contacts.
- Enhance undo command upon pinning or unpinning
- Currently, when using pin command two or more times, calling undo once will not revert the pin operation. This is similar for unpin since they both share the same implementation.
- We plan to allow users to use undo only once to undo all repeated and consecutive pin/unpin attempts.
Appendix: Instructions for manual testing
Below are instructions to test the app manually. Before each test, run /clear to reset the data in PoochPlanner.
Also, take caution when copying the commands to the input box as our commands are space sensitive. Line breaks may result
in spaces being omitted.
Note: These instructions only provide a starting point for testers to work on;
testers are expected to do more exploratory testing.
Launch and shutdown
-
Initial launch
-
Download the
[CS2103T-W10-2][PoochPlanner].jarfile and copy it into an empty folder -
Double-click the
[CS2103T-W10-2][PoochPlanner].jarfile.
Expected: Shows the GUI with an empty contacts list.
-
-
Saving window preferences
-
Resize the window to an optimum size. Move the window to a different location. Close the window.
-
Re-launch the app by double-clicking the
[CS2103T-W10-2][PoochPlanner].jarfile.
Expected: The most recent window size and location is retained.
-
Adding a contact
-
Adding a
Personcontact-
Prerequisites: The specified name of the contact must not already exist in the contacts list.
-
Test case:
/add-person ; name : Person1 ; phone : 98883888 ; address : Pooch Street 32 ; email : impooch@gmail.com
Expected: Adds a person named “Person1” into the contacts list. Details of the added contact is shown in the status message.
-
-
Adding a
Staffcontact-
Prerequisites: The specified name of the contact must not already exist in the contacts list.
-
Test case:
/add-staff ; name : Staff1 ; phone : 98765435 ; address : Poochie Street 21 ; email : ilovecatstoo@gmail.com ; salary : $50/hr ; employment : part-time
Expected: Adds a staff named “Staff1” into the contacts list. Details of the added contact is shown in the status message.
-
-
Adding a
Suppliercontact-
Prerequisites: The specified name of the contact must not already exist in the contacts list.
-
Test case:
/add-supplier ; name : Supplier1 ; phone : 98673098 ; address : Meow Street 24 ; email : ilovewombatstoo@gmail.com ; product : kibble ; price : $98/bag
Expected: Adds a supplier named “Supplier1” into the contacts list. Details of the added contact is shown in the status message.
-
-
Adding a
Maintainercontact-
Prerequisites: The specified name of the contact must not already exist in the contacts list.
-
Test case: ` /add-maintainer ; name : Maintainer1 ; phone : 98765435 ; address : Poochie Street 24 ; email : ihelppooches@gmail.com ; skill : trainer ; commission : $60/hr`
Expected: Adds a maintainer named “Maintainer1” into the contacts list. Details of the added contact is shown in the status message.
-
Editing a contact
-
Editing a
Personcontact-
Prerequisites: The contact to be edited must already exist and should have been added as a
Persontype. You can run the following command to add in aPersonto edit:
/add-person ; name : Person1 ; phone : 98883888 ; address : Pooch Street 32 ; email : impooch@gmail.com -
Test case:
/edit-person ; name : Person1 ; field : { phone : 99820520 }
Expected: The phone field of contact named “Person1” is edited to99820520. Details of the edited contact is shown in the status message. -
Test case:
/edit-person ; name : Person1 ; field : { address : Pooch Street 31 }
Expected: The address field of contact named “Person1” is edited toPooch Street 31. Details of the edited contact is shown in the status message. -
Test case:
/edit-person ; name : Person1 ; field : { phone : 99990520 ; email : impooch@gmail13.com }
Expected: The phone and email field of contact named “Person1” is edited to99990520andimpooch@gmail13.comrespectively. Details of the edited contact is shown in the status message.
-
-
Editing a
Staffcontact-
Prerequisites: The contact to be edited must already exist and should have been added as a
Stafftype. You can run the following command to add in aStaffto edit:
/add-staff ; name : Staff1 ; phone : 98765435 ; address : Poochie Street 21 ; email : ilovecatstoo@gmail.com ; salary : $50/hr ; employment : part-time -
Test case:
/edit-staff ; name : Staff1 ; field : { phone : 99820520 }
Expected: The phone field of contact named “Staff1” is edited to99820520. Details of the edited contact is shown in the status message. -
Test case:
/edit-staff ; name : Staff1 ; field : { salary : $55/hr }
Expected: The salary field of contact named “Staff1” is edited to$55/hr. Details of the edited contact is shown in the status message. -
Test case:
/edit-staff ; name : Staff1 ; field : { employment : full-time }
Expected: The employment field of contact named “Staff1” is edited tofull-time. Details of the edited contact is shown in the status message. -
Test case:
/edit-staff ; name : Staff1 ; field : { salary : $40/hr ; employment : part-time }
Expected: The salary and employment field of contact named “Staff1” is edited to40/hrandpart-timerespectively. Details of the edited contact is shown in the status message.
-
-
Editing a
Suppliercontact-
Prerequisites: The contact to be edited must already exist and should have been added as a
Suppliertype. You can run the following command to add in aSupplierto edit:
/add-supplier ; name : Supplier1 ; phone : 98673098 ; address : Meow Street 24 ; email : ilovewombatstoo@gmail.com ; product : kibble ; price : $98/bag -
Test case:
/edit-supplier ; name : Supplier1 ; field : { phone : 9994555 }
Expected: The phone field of contact named “Supplier1” is edited to9994555. Details of the edited contact is shown in the status message. -
Test case:
/edit-supplier ; name : Supplier1 ; field : { product : dogdiapers }
Expected: The product field of contact named “Supplier1” is edited todogdiapers. Details of the edited contact is shown in the status message. -
Test case:
/edit-supplier ; name : Supplier1 ; field : { price : $10/bag }
Expected: The price field of contact named “Supplier1” is edited to$10/bag. Details of the edited contact is shown in the status message. -
Test case:
/edit-supplier ; name : Supplier1 ; field : { product : kibbles ; price : $75/bag }
Expected: The product and price field of contact named “Supplier1” is edited tokibblesand$75/bagrespectively. Details of the edited contact is shown in the status message.
-
-
Editing a
Maintainercontact-
Prerequisites: The contact to be edited must already exist and should have been added as a
Maintainertype. You can run the following command to add in aMaintainerto edit:
/add-maintainer ; name : Maintainer1 ; phone : 98765435 ; address : Poochie Street 24 ; email : ihelppooches@gmail.com ; skill : trainer ; commission : $60/hr -
Test case:
/edit-maintainer ; name : Maintainer1 ; field : { phone : 84444555 }
Expected: The phone field of contact named “Maintainer1” is edited to84444555. Details of the edited contact is shown in the status message. -
Test case:
/edit-maintainer ; name : Maintainer1 ; field : { commission : $10/hr }
Expected: The commission field of contact named “Maintainer1” is edited to$10/hr. Details of the edited contact is shown in the status message. -
Test case:
/edit-maintainer ; name : Maintainer1 ; field : { skill : cleaner }
Expected: The skill field of contact named “Maintainer1” is edited tocleaner. Details of the edited contact is shown in the status message. -
Test case:
/edit-maintainer ; name : Maintainer1 ; field : { commission : $12/hr ; skill : janitor }
Expected: The commission and skill field of contact named “Maintainer1” is edited to$12/hrandjanitorrespectively. Details of the edited contact is shown in the status message.
-
Searching a contact
-
Searching contacts by name
-
Prerequisites: The contact list must already have some contacts for testing purposes. You may run the following commands to help in testing:
/add-person ; name : Poochie ; phone : 12345678 ; address : Pooch Street 32 ; email : impoochie@gmail.com
/add-person ; name : John Doe ; phone : 88888888 ; address : Pooch Street 32 ; email : imjohndoe@gmail.com
/add-person ; name : John ; phone : 23452345 ; address : Pooch Street 32 ; email : imjohn@gmail.com -
Test case:
/search ; name : John
Expected: Displays contacts with the names “John” and “John Doe”.
-
-
Searching contacts by phone number
-
Prerequisites: The contact list must already have some contacts for testing purposes. You may run the following commands to help in testing:
/add-person ; name : Poochie ; phone : 12345678 ; address : Pooch Street 32 ; email : impoochie@gmail.com
/add-person ; name : John Doe ; phone : 8888888 ; address : Pooch Street 32 ; email : imjohndoe@gmail.com
/add-person ; name : John ; phone : 23452345 ; address : Pooch Street 32 ; email : imjohn@gmail.com -
Test case:
/search ; phone : 12345678
Expected: Displays only one contact named “Poochie” with the phone number12345678.
-
Deleting a contact
-
Deleting a contact while all contacts are being shown
-
Prerequisites: Only one contact with the name Poochie should exist in PoochPlanner. If not, run the following command to ensure add Poochie into PoochPlanner. PoochPlanner does not accept duplicate names so there will not be an instance where there is more than one contact with the name Poochie that exists in the contacts list.
/add-person ; name : Poochie ; phone : 98883888 ; address : Pooch Street 32 ; email : impoochie@gmail.com -
Test case:
/delete ; name : Poochie
Expected: Contact named Poochie is deleted from the list. Contact type and name of the deleted contact is shown in the status message. Timestamp in the status bar is updated. -
Test case:
/delete ; name : Moochie
Expected: No contact is deleted. Error details shown in the status message. Status bar remains the same. -
Test case:
/delete
Expected: No contact is deleted. Error details shown in the status message. Status bar remains the same. -
Other incorrect delete commands to try:
/delete,delete ; name :
Expected: Similar to previous.
-
Rating a contact
-
Rating a contact while all contacts are being shown
-
Prerequisites: Only one contact with the name Poochie should exist in PoochPlanner. If not, run the following command to ensure add Poochie into PoochPlanner. PoochPlanner does not accept duplicate names so there will not be an instance where there is more than one contact with the name Poochie that exists in the contacts list.
/add-person ; name : Poochie ; phone : 98883888 ; address : Pooch Street 32 ; email : impoochie@gmail.com -
Test case:
/rate ; name : Poochie ; rating : 5
Expected: Contact named Poochie is updated with a rating of 5. Contact type and name of the rated contact is shown in the status message. Timestamp in the status bar is updated. -
Test case:
/rate ; name : Moochie ; rating : 5
Expected: No contact is rated. Error details shown in the status message. Status bar remains the same. -
Test case:
/rate ; name : Poochie ; rating : 6
Expected: No contact is rated. Error details shown in the status message. Status bar remains the same.
-
Pinning a contact
-
Pinning a contact while all contacts are being shown
-
Prerequisites: Only one contact with the name Poochie should exist in PoochPlanner. If not, run the following command to ensure add Poochie into PoochPlanner. PoochPlanner does not accept duplicate names so there will not be an instance where there is more than one contact with the name Poochie that exists in the contacts list.
/add-person ; name : Poochie ; phone : 98883888 ; address : Pooch Street 32 ; email : impoochie@gmail.com -
Test case:
/pin ; name : Poochie
Expected: Contact named Poochie is pinned at the top of the contact list.
-
Unpinning a contact
-
Unpinning a contact while all contacts are being shown
-
Prerequisites: Only one contact with the name Poochie should exist in PoochPlanner. If not, run the following command to ensure add Poochie into PoochPlanner. PoochPlanner does not accept duplicate names so there will not be an instance where there is more than one contact with the name Poochie that exists in the contacts list.
/add-person ; name : Poochie ; phone : 98883888 ; address : Pooch Street 32 ; email : impoochie@gmail.com
/pin ; name : Poochie -
Test case:
/unpin ; name : Poochie
Expected: Contact named Poochie is no longer pinned at the top of the contact list.
-
Sorting contacts list
-
Sorting contacts by name
-
Prerequisites: The contacts list must have some contacts for testing purposes. You may run the following commands first to help in testing:
/add-person ; name : Poochie ; phone : 12345678 ; address : Pooch Street 32 ; email : impoochie@gmail.com
/add-person ; name : John Doe ; phone : 88888888 ; address : Pooch Street 32 ; email : imjohndoe@gmail.com
/add-person ; name : John ; phone : 23452345 ; address : Pooch Street 32 ; email : imjohn@gmail.com -
Test case:
/sort ; field : name
Expected: Displays all contacts sorted by name in ascending order.
-
-
Sorting contacts by phone number
-
Prerequisites: The contacts list must have some contacts for testing purposes. You may run the following commands first to help in testing:
/add-person ; name : Poochie ; phone : 12345678 ; address : Pooch Street 32 ; email : impoochie@gmail.com
/add-person ; name : John Doe ; phone : 88888888 ; address : Pooch Street 32 ; email : imjohndoe@gmail.com
/add-person ; name : John ; phone : 23452345 ; address : Pooch Street 32 ; email : imjohn@gmail.com -
Test case:
/sort ; field : phone
Expected: Displays all contacts sorted by phone number in ascending order.
-
Adding a note to a contact
-
Adding a note (no deadline) to a contact
-
Prerequisites: The contact to add a note to must already exist. This contact can be of
Person/Supplier/Staff/Maintainertype. You can run the following command to add a contact:
/add-person ; name : Poochie ; phone : 98883888 ; address : Pooch Street 32 ; email : impoochie@gmail.com -
Test case:
/note ; name : Poochie ; note : get kibble
Expected: Adds a note to a contact named Poochie.
-
-
Adding a note (with deadline) to a contact
-
Prerequisites: The contact to add a note to must already exist. This contact can be of
Person/Supplier/Staff/Maintainertype. You can run the following command to add a contact:
/add-person ; name : Poochie ; phone : 98883888 ; address : Pooch Street 32 ; email : impoochie@gmail.com -
Test case:
/note ; name : Poochie ; note : get kibble ; deadline : 2024-10-10
Expected: Adds a note with deadline to a contact named Poochie.
-
Undoing a command
-
Undoing a command that modifies the contacts list
-
Prerequisites: The previous command must have modified the contacts list. You may run the following command first to modify the contact book:
/add-person ; name : Poochie ; phone : 98883888 ; address : Pooch Street 32 ; email : impoochie@gmail.com -
Test case:
/undo
Expected: Reverts the changes in the contacts list to just before executing theadd-personcommand.
-
-
Undoing a command that does not modify the contacts list
-
Prerequisites: The previous command must not have made any modifications to the contacts list. You may run the following two commands, whereby the second command does not modify the contacts list:
/add-person ; name : Poochie ; phone : 98883888 ; address : Pooch Street 32 ; email : impoochie@gmail.com
/search ; name : Poochie -
Test case:
/undo
Expected: In this case, as no modifications were made directly to the contacts list upon performing thesearchcommand, theundocommand reverts back the changes to just before theadd-personis executed.
-
Redoing a command
-
Redoing an undo command
-
Prerequisites: There must have been at least one undo command executed. You may run the following command before testing:
/add-person ; name : Poochie ; phone : 98883888 ; address : Pooch Street 32 ; email : impoochie@gmail.com
/undo -
Test case:
/redo
Expected: Reverts the changes caused by theundocommand to just right afteradd-personcommand is executed.
-
Viewing reminders
-
Viewing a reminder
-
Prerequisites: There must be a contact with a note that has a deadline on or after today’s date. You may run the following commands to add such a contact:
/add-person ; name : Poochie ; phone : 98883888 ; address : Pooch Street 32 ; email : impoochie@gmail.com
/note ; name : Poochie ; note : get kibble ; deadline : 2024-10-10 -
Test case:
/remind
Expected: Displays the contact named Poochie with the note deadline after today (note: if there are other contacts in the contacts list with notes that have deadlines on or after today’s date, they will also appear).
-
Viewing help
-
Viewing help
- Test case:
/help ; command : delete
Expected: Displays help details for the delete command.
- Test case:
Appendix : Effort
Project Overview
Our project aimed to enhance the functionality of a contact management system, building upon the foundation laid by AB3 (Address Book 3). Key improvements included accommodating multiple types of contacts, refining command formats for user-friendliness, introducing dynamic search and sorting capabilities, implementing note and reminder features, integrating pin and unpin functionalities, and incorporating undo and redo functionalities. These enhancements aimed to provide users with a more intuitive and efficient contact management experience.
Difficulty Level and Challenges Faced
The project faced significant challenges due to its complexity and the need to seamlessly integrate new features with the existing AB3 framework. One major challenge was accommodating multiple types of contacts (Person, Staff, Maintainer, Supplier) while ensuring compatibility with the original AB3 data model and commands. This required thorough understanding of the project structure and meticulous modification of existing components, particularly the JsonAdaptedPerson classes.
Additionally, redesigning command formats and implementing new features such as dynamic search, sorting, note/reminder functionalities, and pin/unpin features demanded careful planning and detailed implementation. Adapting the undo and redo features from AB4 to fit within the AB3 framework posed another challenge, as it necessitated significant modifications to ModelManager and command execution flow while ensuring backward compatibility.
Effort Required
The effort required for the project was substantial, spanning analysis, design, development, testing, and documentation phases. The multidisciplinary team invested significant time and resources in understanding AB3’s architecture, identifying areas for enhancement, and implementing new features while ensuring compatibility and stability. Agile methodologies were employed to iteratively address challenges and incorporate stakeholder feedback, resulting in an efficient developmental process.
Achievements
Despite the challenges, the project achieved several milestones that significantly enhanced the contact management system’s functionality and user experience. Key achievements included:
- Successful integration of multiple contact types, providing users with greater flexibility and organizational capabilities.
- Redesigning command formats for improved intuitiveness and ease of use, enhancing user interaction.
- Implementation of dynamic search and sorting functionalities, empowering users to efficiently navigate and manage their contacts.
- Introduction of note and reminder features, enabling users to add context and schedule tasks associated with contacts.
- Seamless integration of pin and unpin functionalities, allowing users to prioritize contacts.
- Seamless integration of undo and redo functionalities, allowing users to navigate between different states of their contacts list, improving data integrity.
Effort Saved Through Reuse:
Approximately 10% of the project effort was saved through strategic reuse of existing components and libraries. Notably, the redesign of command formats leveraged insights from previous projects and industry best practices, streamlining development and ensuring consistency. Additionally, adapting the undo and redo features from AB4 involved reusing core concepts and methodologies, significantly reducing implementation complexity and effort.
In summary, the project’s successful implementation of advanced features within the AB3 framework demonstrates our team’s proficiency in software development and problem-solving. Despite the inherent challenges, our strategic approach to reuse and adaptation resulted in a robust and feature-rich contact management system that meets the evolving needs of users.
Acknowledgements
- PoochPlanner is based on the AddressBook-Level3 project created by the SE-EDU initiative.
- The undo and redo features (including the design and UML diagrams) was inspired and reused with minimal changes from SE-addressbook.